One thing that comes with the remote-hybrid workplace settings we use today is the need to attend virtual meetings often. Virtual meetings are the best way for remote teams to come together and discuss collaborative work strategies. If you are planning a virtual conference, you will need suitable software. Zoom is one of the best conference software options. Over 350 million virtual meetings are hosted by Zoom daily, so it is a tried-and-tested platform!
But even as the best platform, there’s something we call Zoom fatigue. When it hits, you can start recording your meetings to ease the pressure a bit. If you record a meeting, you can revisit the discussion later alone or with your team. This way, Zoom recordings make collaboration and teamwork easier down the road.
So, what do you need to record a Zoom meeting? As the host, you can use the Zoom recording feature. If you’re a participant without the authorization to record, you can use a third-party tool, such as the Zight screen recorder app. Let’s tell you more!
How to Record Zoom Meetings With the Built-In Feature
You can only use the built-in record feature for local recordings if:
- You are the meeting organizer/host
- Are authorized to record the meeting by the host
1. Local Recoding as the Host
You might need to enable the Local Recording feature online to record a Zoom meeting locally as the host (although this is enabled by default on most accounts). If you need to, sign into your Zoom account on the web browser, navigate to “Settings” under your profile, and then select “Recording”. Here, ensure that “Local Recording” is enabled. You may need to confirm this setting by clicking ‘Enable’ again. You can also lock this setting to make it the default for all users in your account.
Then, you can record your Zoom meeting as follows:
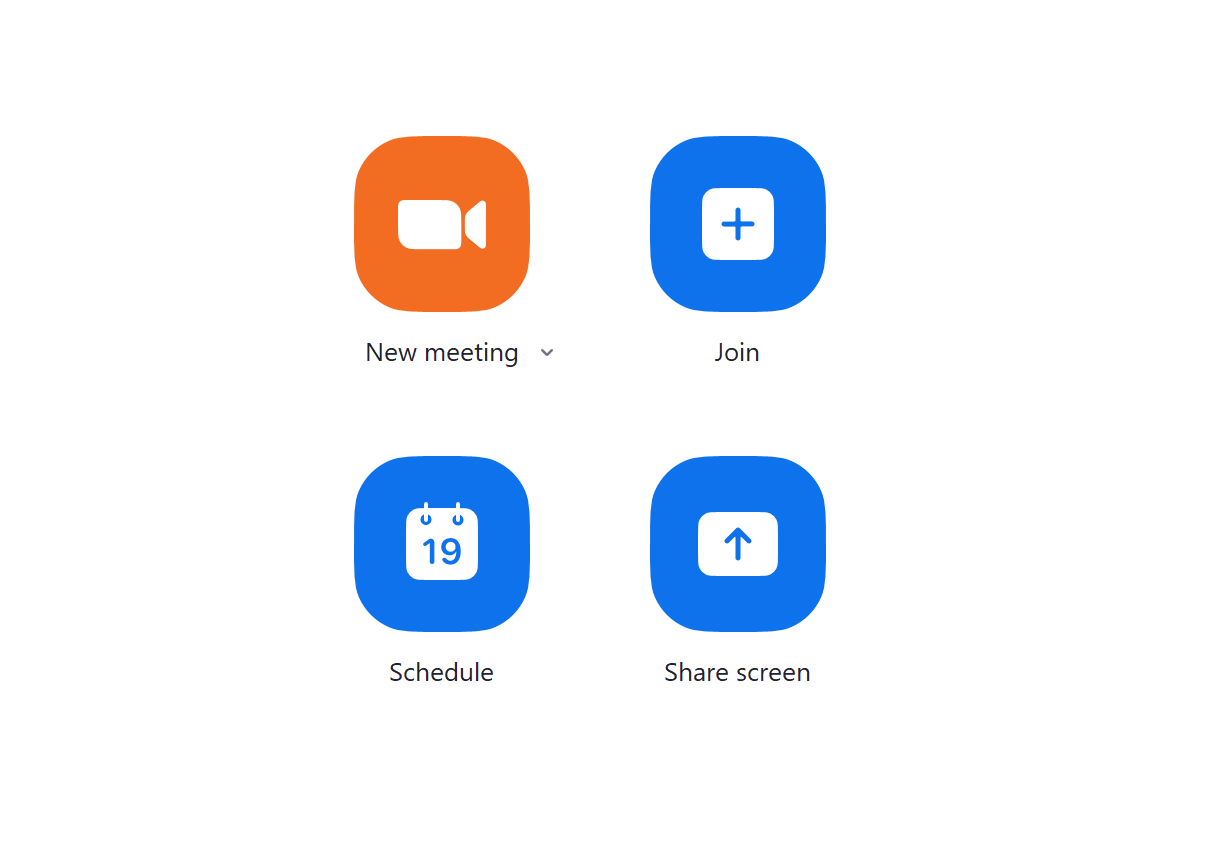
Step 1: Start a New Meeting as the host.
Step 2: On a computer, look for the “Record” button on the toolbar at the bottom of the Zoom window (it may be under the “More” option if the meeting window is condensed). From the options that appear, select “Record on this Computer.” This will start recording everything in your Zoom meeting, including video and audio.

Step 3: During the meeting, you can pause or stop the recording by clicking the corresponding buttons on the Zoom toolbar once the recording has started.
Step 4: When your meeting ends, the recording will stop automatically. However, you can manually stop it by clicking “Stop Recording.” Zoom will convert the recording file into MP4. Once this conversion process is complete, the recording file folder will automatically open. By default, Zoom saves MP4 recordings in the Zoom folder located in your Documents directory.
Step 5: To view all your recordings, open the Zoom client, go to the “Meetings” tab, and click on the “Recorded” tab. Here, you’ll find a list of your recordings, which you can play, share, or delete.
Quick Tip: Remember that local recordings are stored on the device used to record the meeting, so if someone else needs access to the recording, you’ll need to share the file with them manually.
Local recordings are ideal for quick access and control but do not support features like automatic transcription or recording separate audio tracks for each participant. However, you can record multiple audio files as a host, but after a few settings. To enable this;
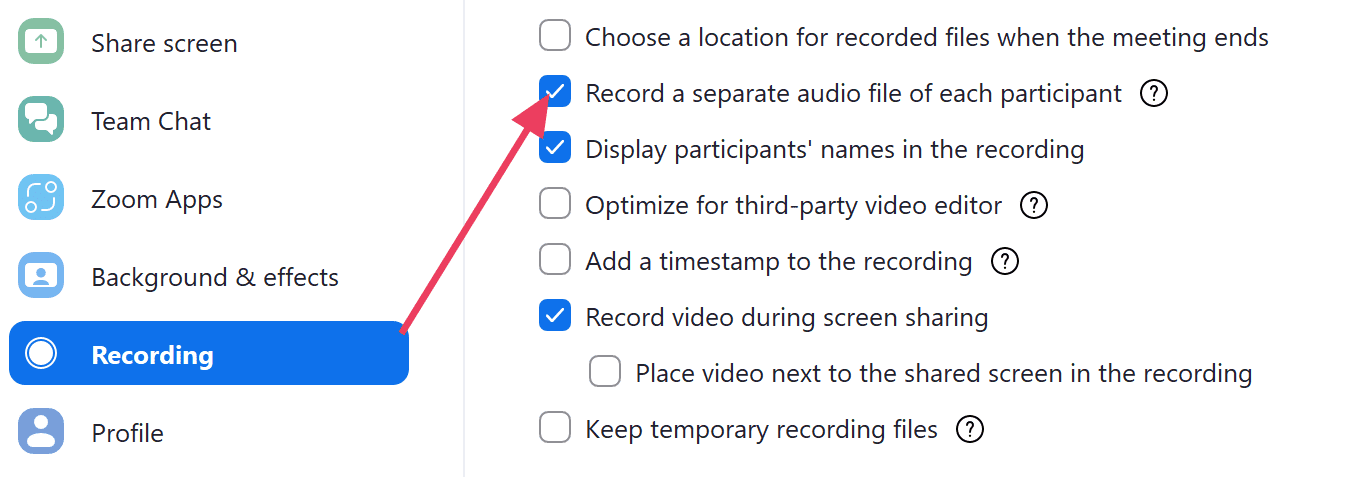
- Launch your Zoom Client. Navigate to your profile, and from the drop-down menu, click “Settings.”
- Click “Recording” and turn on “Record a separate audio file for each participant.” This will let you record a Zoom meeting and capture each participant’s audio track.
2. How to Record A Zoom Meeting as a Participant
You can record a Zoom meeting as a participant on your laptop or desktop. Here’s a general guide on how to do this:
Step 1: Join the meeting using the link provided by the host or by entering the Meeting ID and passcode.
Step 2: To record the Zoom meeting, locate the Record button and click it. A pop-up may appear on your screen requesting you to ask the host for recording permission.
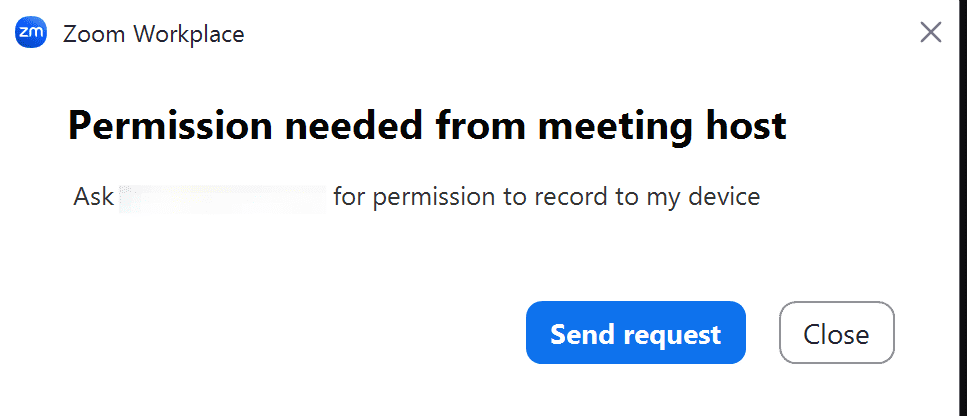
Step 3: If the host grants permission, you will receive a notification on your screen. Click the Record button again to start the recording process. Zoom will announce to all participants that the meeting is being recorded.
Step 4: When the meeting ends, Zoom will convert the file into a viewable format and save the file in the Zoom folder in your Documents directory.
How to Record Zoom Meetings and Save Them to The Cloud
With the two methods above, the Zoom meeting recordings will be saved on your computer. This is a detractor for three reasons: first, you can easily lose the recordings if you replace your laptop. In addition, saving the videos locally complicates the sharing option—you have to upload the whole video file, and your recipient will have to download it and save it locally on their device. Finally, the video file will eat up computer space, which has consequences, including slowing the computer.
It’s time to change this by saving your Zoom recordings on the cloud. You can do this by:
- Activating cloud recording on your Zoom client
- Using a third-party tool that will make the process easier
1. How to Enable Cloud Recording When Recording a Zoom Meeting
You must have a Pro, Business, or Enterprise account to save your Zoom meeting recordings to the Zoom cloud. In addition, you can only save to the cloud as a host or assign someone in your team as the co-host.
Here’s how to record to the cloud:
Step 1: Start your Zoom meeting as a host, and click the record button.
Step 2: Select “Record to the Cloud.”
Step 3: Your meeting will be recorded, and once you’re done, Zoom will upload it to the cloud and email you the link. From here, you can view, manage, and share the link as necessary.
2. The Better Way? Use a Third-Party Tool
Suppose you are not the meeting host, can’t get permission to record, or are on a free Zoom account, so you cannot record the meeting to the cloud. To record and save your meeting to the cloud, you can use Zight.
With our screen recorder tool, all you need to do is ask the host and participants permission to record — this is imperative so you adhere to privacy rules and Zoom standards. Here’s what to do before the meeting, though:
Step 1: Download and install Zight on your computer or iPhone. The screen recording software is compatible with Windows and Mac and also comes as a Google Chrome extension. The process is pretty simple, too. Head over to the website, click Sign Up Free, and create your Zight account. After that, download the right app for your device.
Step 2: Start hosting or join a Zoom meeting. When all participants join, inform them that you wish to record the meeting for future team use.
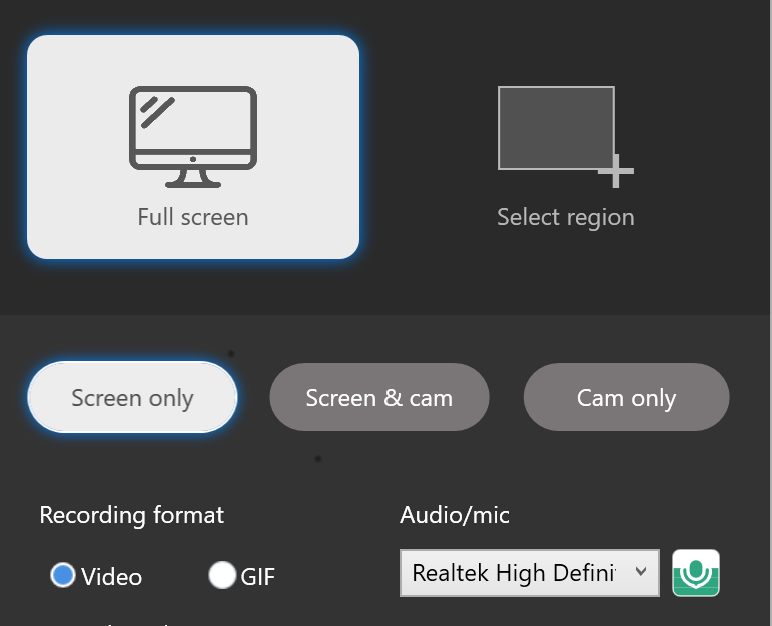
Step 3: If everyone agrees with the recording, launch your Zight application and click “Record.” Alternatively, you can use simple Zight shortcuts like Alt + Shift + 6 (Windows) or Command + Shift + 6 (Mac). This will open a new page on Zight where you can select your recording preferences. Since you are recording the screen, you can choose Full-Screen recording and Screen only. Then, turn on the audio/mic option to capture speakers.
Step 4: Click the “Start Recording” button. A three-second timer will run before you can record.
Step 5: You can pause your recording to annotate as the meeting progresses. Video annotation is superb since you can highlight important parts with different elements. On Zight, these are the arrow, line, ellipse, rectangle, pen, and highlighter. Apply your best annotations, and you can even set a timer and different colors for each so they stand out after recording.
Step 6: After the meeting, press “Finish Recording,” and Zight will automatically start uploading the recording to the cloud. Once this process is complete, the video link will be copied to your clipboard and opened on your default browser.
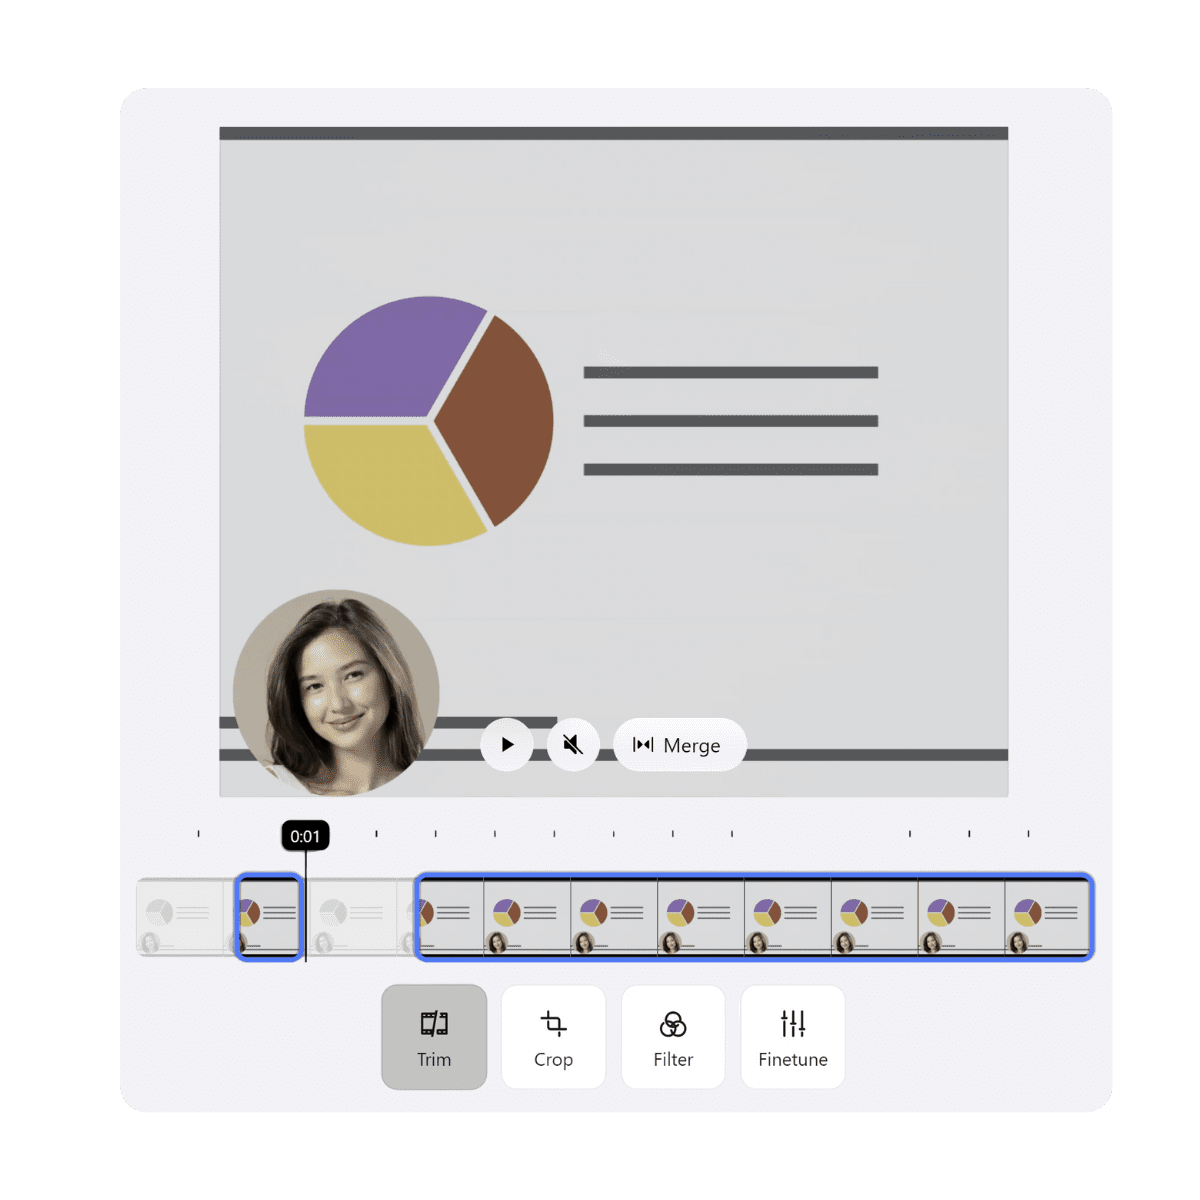
Step 7: On the browser, you can edit your video more with features like trimming, splitting and merging sections, cropping, and more before sharing. You only need to copy the Zight link and paste it to your recipient to share the meeting recording.
As you can see, Zight is easy to use and offers much more than the built-in Zoom recording feature. With this software, anyone can record a Zoom meeting. Even if the meeting runs long, you can record and then share the large video file with ease.
In addition, Zight guarantees reliable cloud storage and collaboration features. Unlike when recording with Zoom, Zight automatically uploads your video online, and from there, you can download the meeting to your computer.
With a meeting recording stored online, you send recipients the link, and they, too, can view and comment on the video from that link. So, there’s no need to download a large file—even if they don’t use Zight. In this way, Zight is the best video-sharing platform for sharing meetings.
An even better benefit here is online collaboration. When you record a Zoom meeting with Zight, you eliminate the need for back-and-forth communication, primarily via email or text. Instead, you can annotate the video to leave instructions. You can also comment on the video online, tagging your team members so they can be notified of your new instructions. This makes visual collaboration easier and also improves asynchronous communication, which is so valuable in remote-based work environments.
Wrapping Up…
By now, you can record a Zoom meeting easily on your computer. You can use the built-in feature as a host or meeting participant and even record to the cloud if you are on a paid Zoom plan.
If you want the best tool for recording online meetings, Zight makes a good case. We’ve shown you how to record your Zoom meeting in a few steps here. Did you know you can also record a Microsoft Teams meeting and a Google Meet meeting using Zight, too?
Sign up for your free Zight account to get started!

