Remember a time, just a few years ago, when you has to spend hours writing product descriptions, debugging code, or crafting the perfect email? Yeah, those should be behind you now if you embrace artificial intelligence (AI).
Speaking of which, you’ve probably heard the buzz about ChatGPT, OpenAI’s superb AI assistant – and trust me, it lives up to the hype. ChatGPT already attracts over 393 million users per month, most of whom use it for work-related help. If you use it well, it’ll transform your productivity and efficiency. ChatGPT is ideal for most professionals – marketers, sales teams, content creators, you name it!
Ask it anything – it could be to break down complex topics, generate fresh ideas, or automate repetitive writing. Plus, you can use it alongside your existing tools, including Zight’s screen recording app and screenshot tool, to analyze visual content.
In this ChatGPT tutorial, I will show you how to use this AI productivity tool for your daily workflows. Let’s get started.
What Is ChatGPT?
At its core, ChatGPT is an AI that processes and generates human language – but that simple description barely scratches the surface of what it can actually do.
ChatGPT processes your input by understanding context and intent, not just individual words – it analyzes the meaning behind your words and generates responses based on its training across billions of text examples. It also adapts its tone from casual to professional, understands nuance, and picks up on subtle contextual clues in your writing.
Here are just a few things you can do with the AI:
- Start voice or text conversations about any topic you’re curious about
- Generate text content: poems, blog posts, emails, scripts
- Brainstorm and develop new ideas for your projects on Canvas
- Create and modify images with DALL-E
- Get current information through web browsing (mostly for Plus users)
- Analyze images you share with it – including Zight screenshots!
- Create visual data representations like charts and graphs
- Analyze datasets and numbers
- Convert your plain English descriptions into working code
But before you can do any of these, you want to create your account and understand the ChatGPT interface. Here are some tips:
Getting Started with ChatGPT
Want to create an account and learn the AI’s features right away?
1. Creating Your Account

Head to chat.openai.com and click ‘Sign Up.’ You can use your Google or Microsoft account or create a new account with your email or Apple ID. After verifying your contact information, you’ll land on the main chat interface.
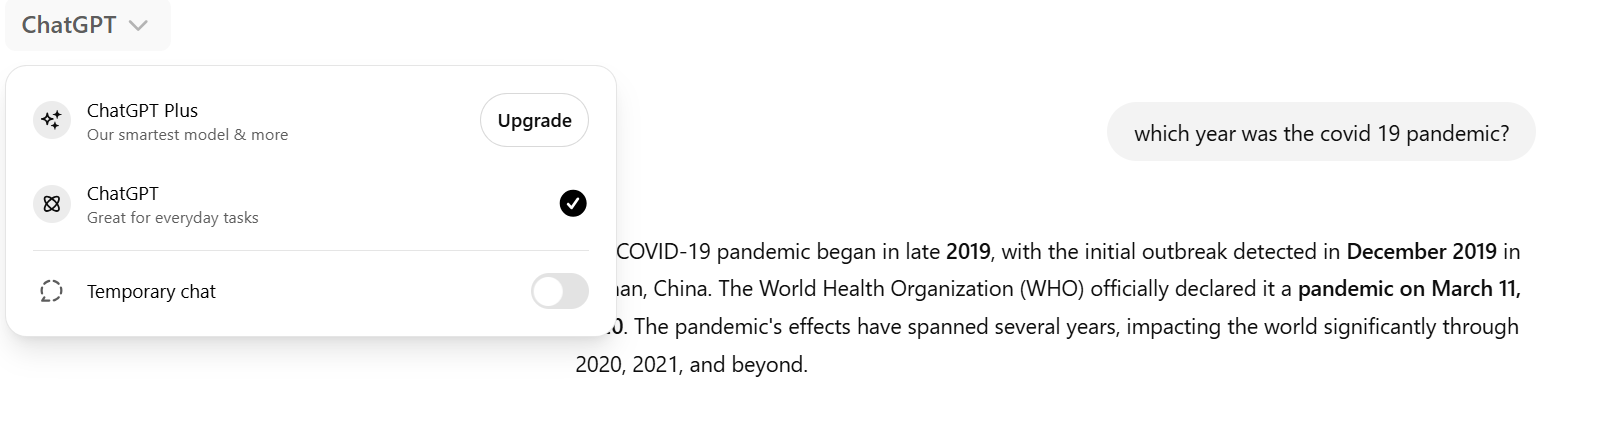
You’ll also need to choose between ChatGPT free or Plus. Depending on the version you go for, you will get a few or all of these models:
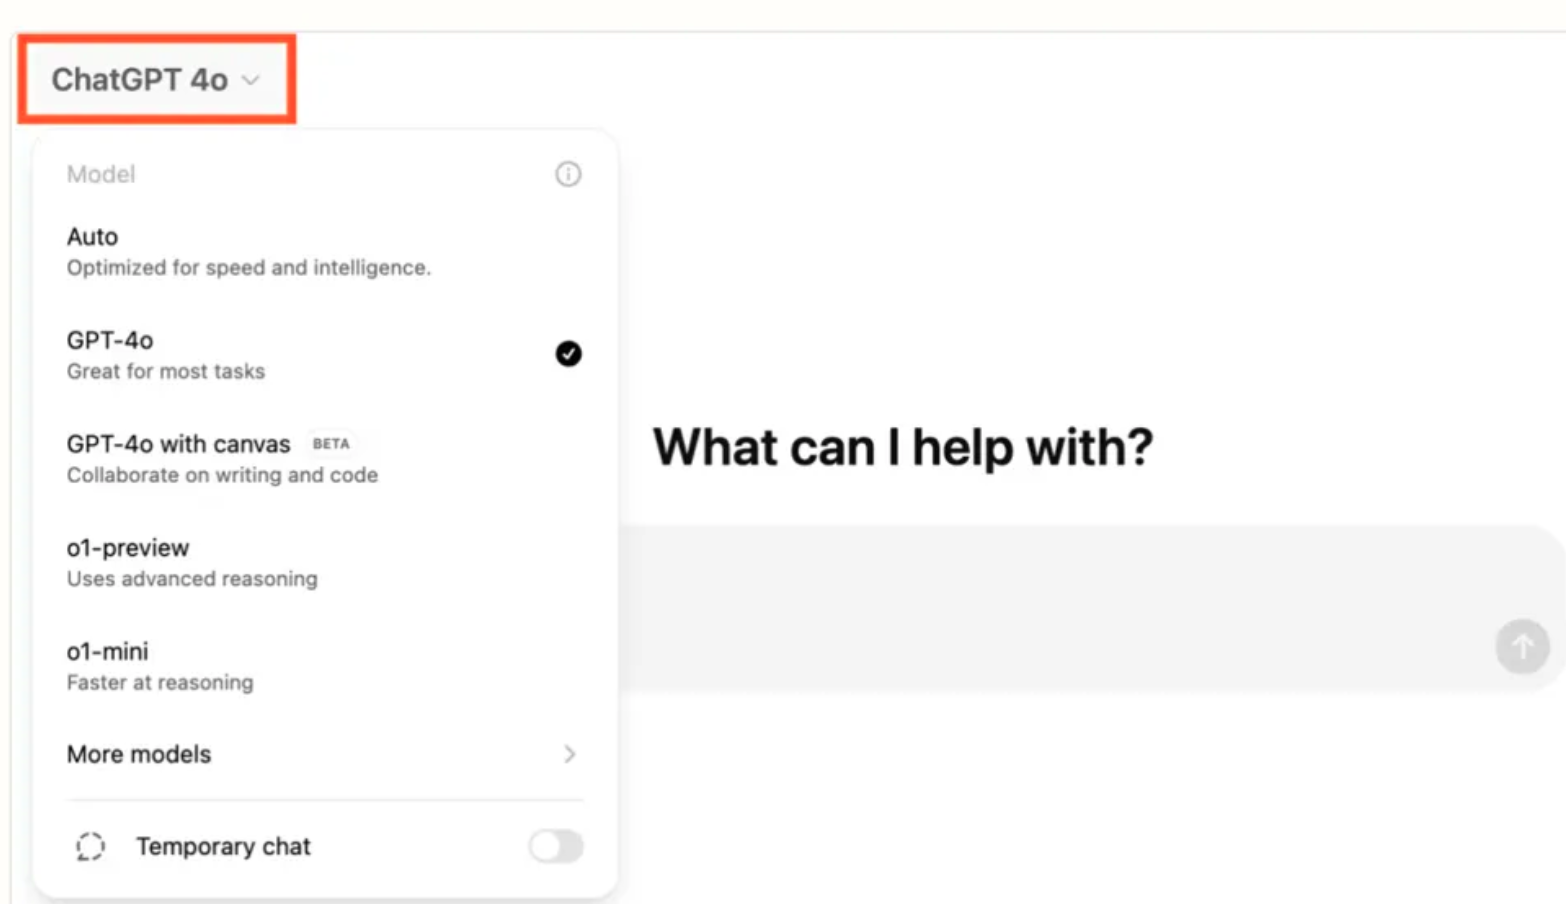
The free version gives you access to ChatGPT 3.5 (the free and automatic model) and GPT-4o mini, which can handle the most basic tasks well and allow you to search online for a limited time. You’ll get standard response times and can access ChatGPT through the web interface – it’s perfect for trying out the platform and handling everyday tasks.
But if you’re planning to use ChatGPT professionally or need more advanced features for your own business, the Plus subscription at $20 per month might be worth considering. You’ll get access to more nuanced responses and better reasoning capabilities with these models:
- GPT-4o: Handles most general tasks effectively, including searching online and creative writing
- GPT-4o with Canvas (Beta): Specifically designed for collaborative writing and coding projects
- o1-preview: Good for logical reasoning tasks and code generation
- o1-mini: A faster version of o1, trading some capabilities for speed
Plus ChatGPT users also enjoy faster response times, voice conversations, and DALL-E for image generation. One of the most valuable Plus features is custom instructions that persist across conversations, so ChatGPT will always understand your preferences and needs. If you’re on the Plus account, you can always have ChatGPT search the web for the most recent info!
2. ChatGPT’s Device Compatibility
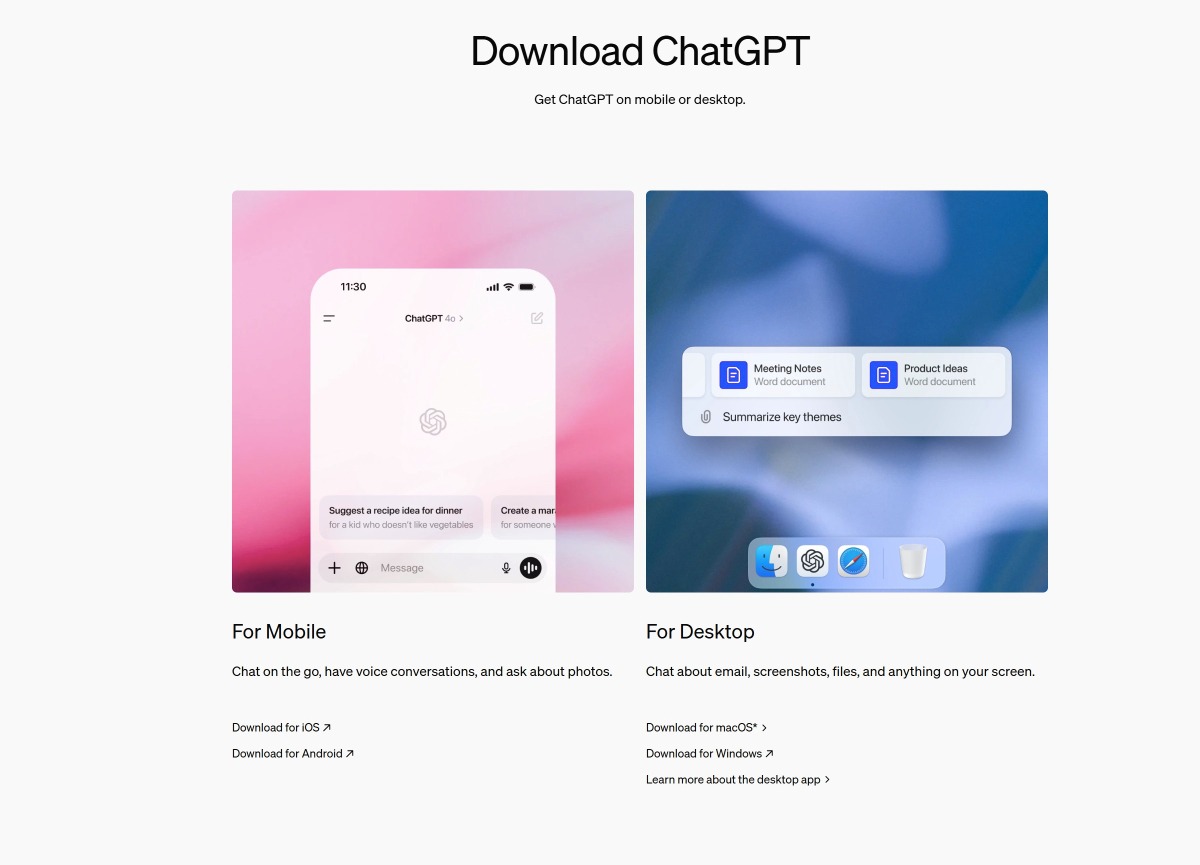
You’ve got several ways to use ChatGPT, and each offers a slightly different experience. The web version at chat.openai.com works on any browser – Chrome, Safari, Firefox, you name it. You just need to log in on your Mac or Windows device, and you’re ready to go – it’s perfect for when you’re working on your laptop or desktop and want the full-screen experience.
Alternatively, you can use ChatGPT on mobile. If you have an iPhone, you can download the app for free from the Apple Apps Store. The process is similar on Android – just search for and download the free app from Google Play Store. Your mobile conversations will automatically sync with your account, so you can even continue them later on your laptop (or a different device).
Generally, the web version gives you the most screen space for longer conversations and complex tasks. The mobile apps are good when you need quick answers or want to use voice features.
Once you download the ChatGPT app on your desktop, you can use these simple shortcuts to launch the chat box:
- Option + Spacebar on Mac
- Alt + Spacebar on Windows
When you enter these shortcuts, you will get a popup chat box that will float above your screen content.
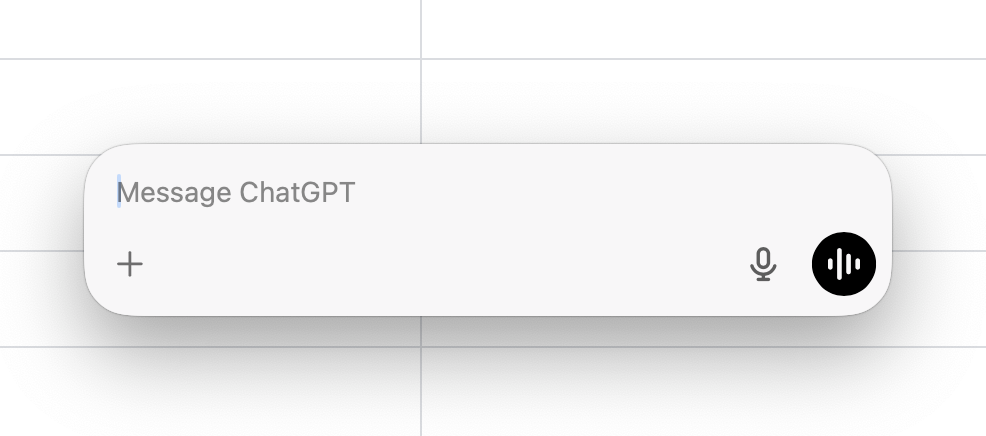
Type your prompt, use the voice mode, or upload a file to start a conversation. You can continue the chat as you usually do on the ChatGPT website:
3. Understanding the Interface
From the ChatGPT interface, you’ll be able to start a new chat in the message box. Your conversation history will be stored in the sidebar, and your model selection (GPT-3.5, ChatGPT 4o, or GPT-4 for Plus users) will be at the top of each chat.
You can add attachments and voice notes and choose the tools to use for each message – including DALL-E to generate images and Canvas for collaborations and writing code.
4. Starting Your First Chat
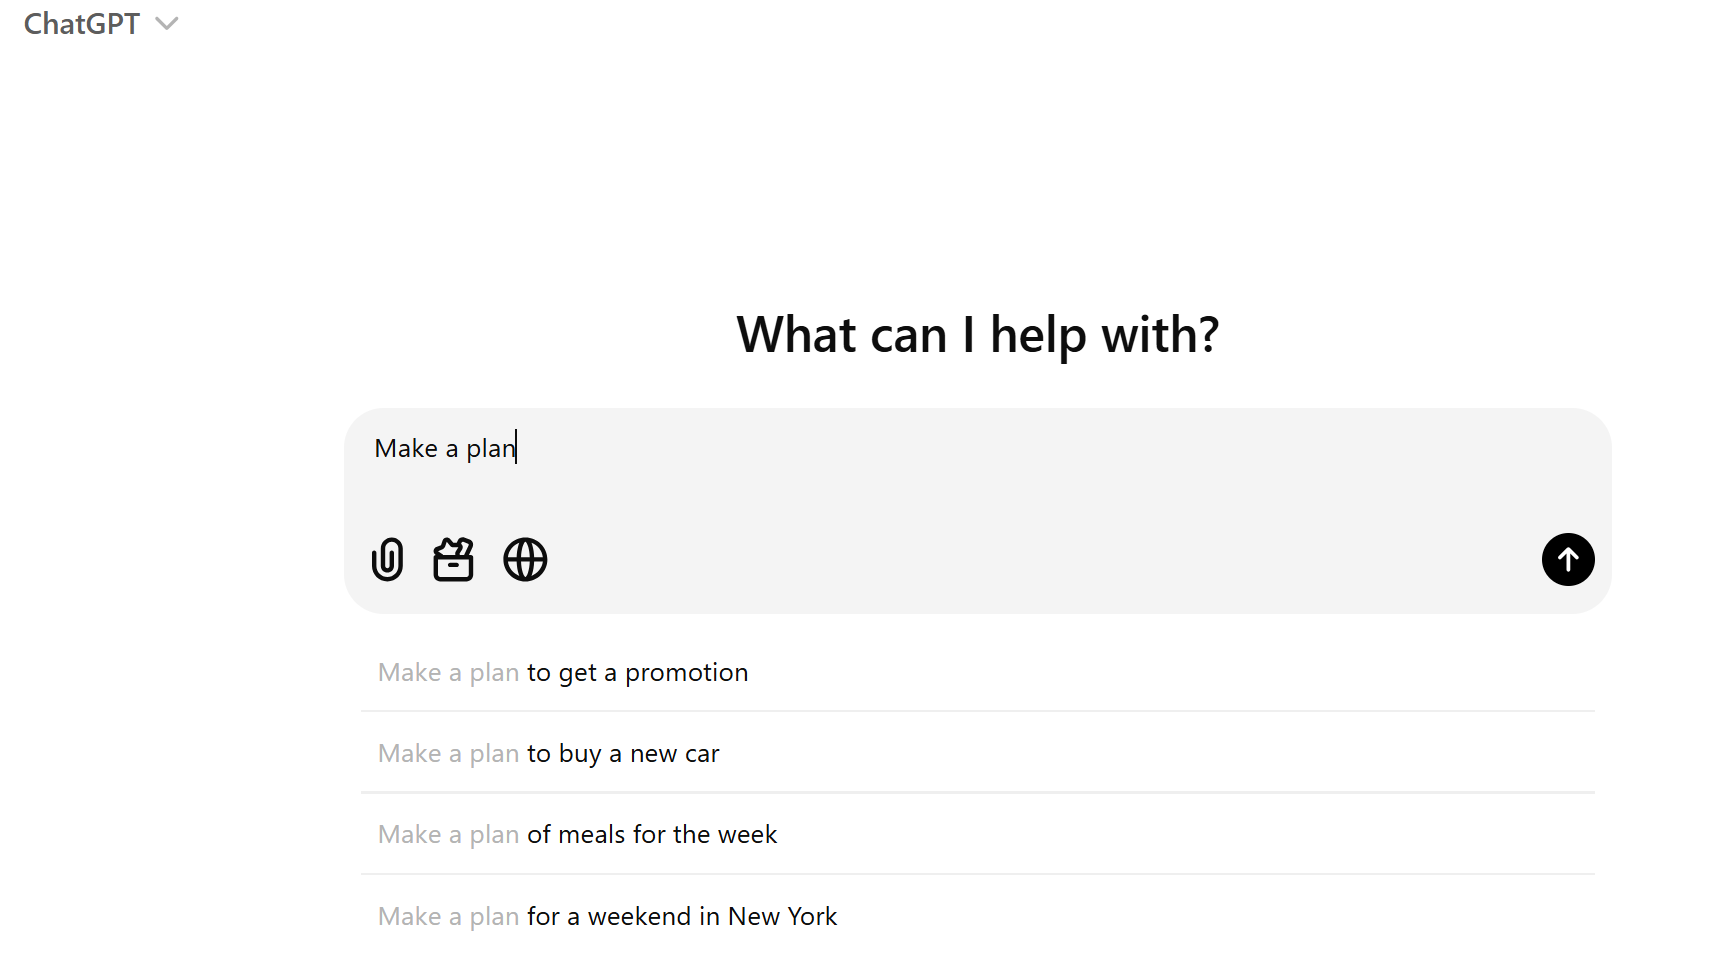
When you’re ready to start your first conversation, you can start with something simple, like explaining a concept you’re familiar with or drafting a basic email.
Or, click any of the preset prompts below the message box. For instance, if you click ‘Make a Plan’ below, the AI will help you drive the conversation in your intended direction as follows:
You can work with different prompts to get a feel for how ChatGPT communicates and responds to your inputs. Here’s more on how to use ChatGPT effectively, especially improving your prompts:
Effective Communication with ChatGPT
Once you familiarize yourself with the ChatGPT homepage, you can start chatting with it for the most useful information. Here are a few features you should use:
1. ChatGPT Voice Mode
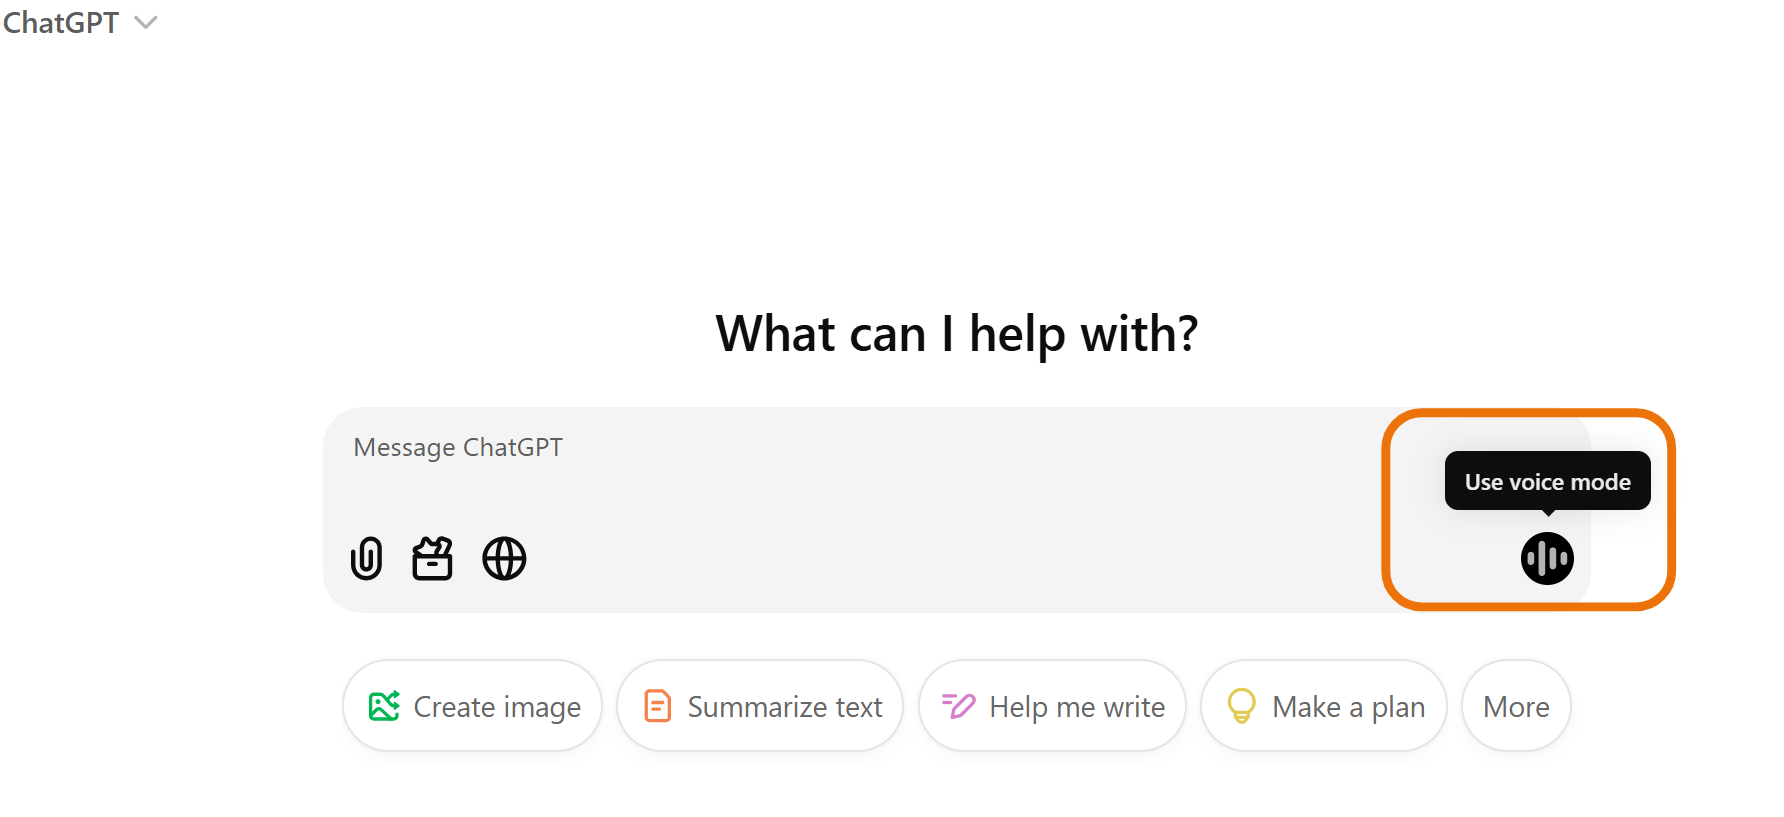
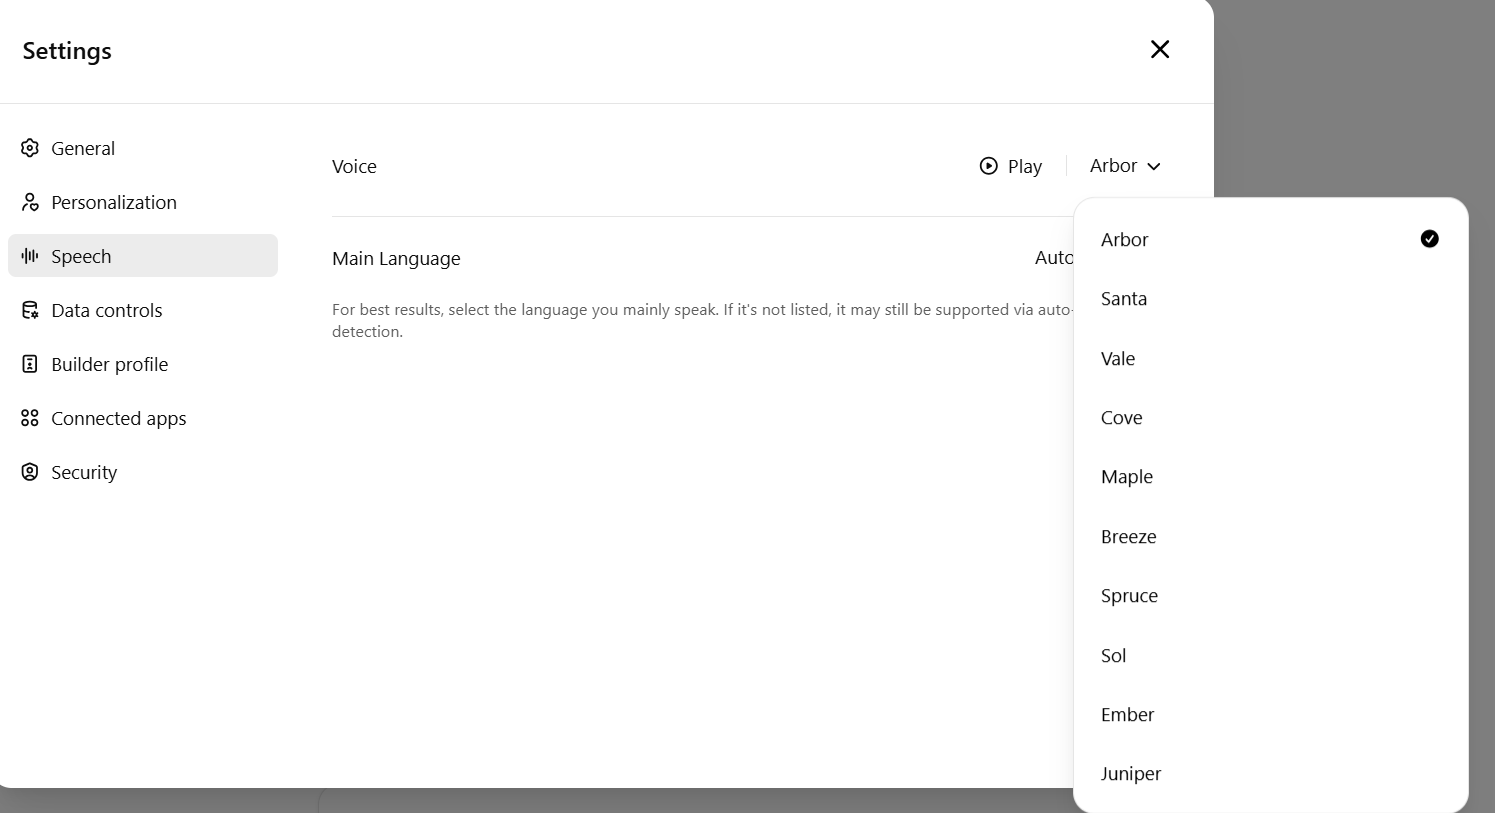
ChatGPT offers free monthly previews of advanced voice mode so you can test natural conversations. When using this feature for the first time, you’ll need to choose a voice personality – like Santa, Vale, or Cove. You can also always change your voice personality by clicking Settings>Speech>Voice.
All your ChatGPT conversations will be saved and fully controlled by you – you can delete recordings anytime. Keep in mind that voice mode, just like text mode, can make mistakes, so double-check important information.
3. Attaching Files
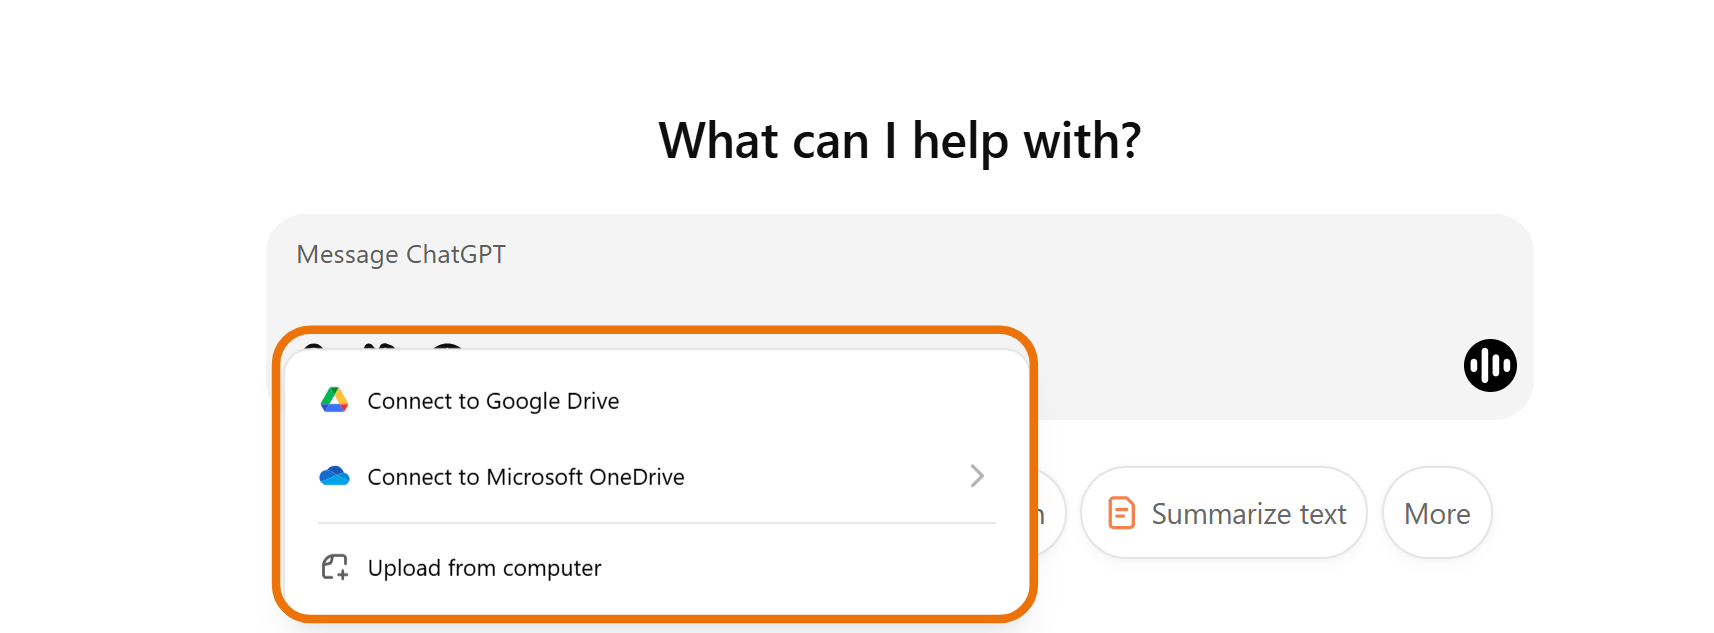
Need to process large documents or datasets? You can upload a file to your ChatGPT message box through multiple paths:
- Connect your Google Drive
- Link your Microsoft OneDrive
- Upload directly from your computer
Once connected, ask ChatGPT to summarize text, analyze data, or work with the content in various ways.
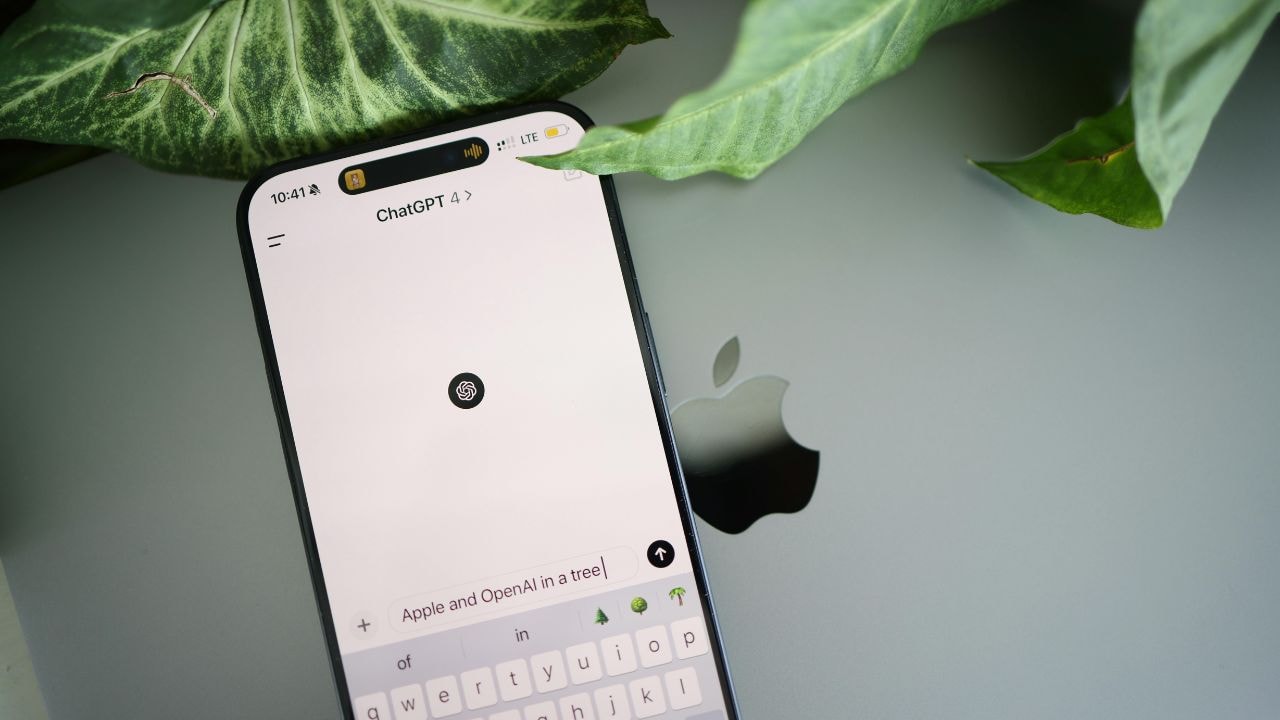
Suppose you’ve taken a screenshot with Zight or have an image you want ChatGPT to analyze. You don’t have to upload this manually – instead, copy the image to your clipboard, then paste it to the chat box.
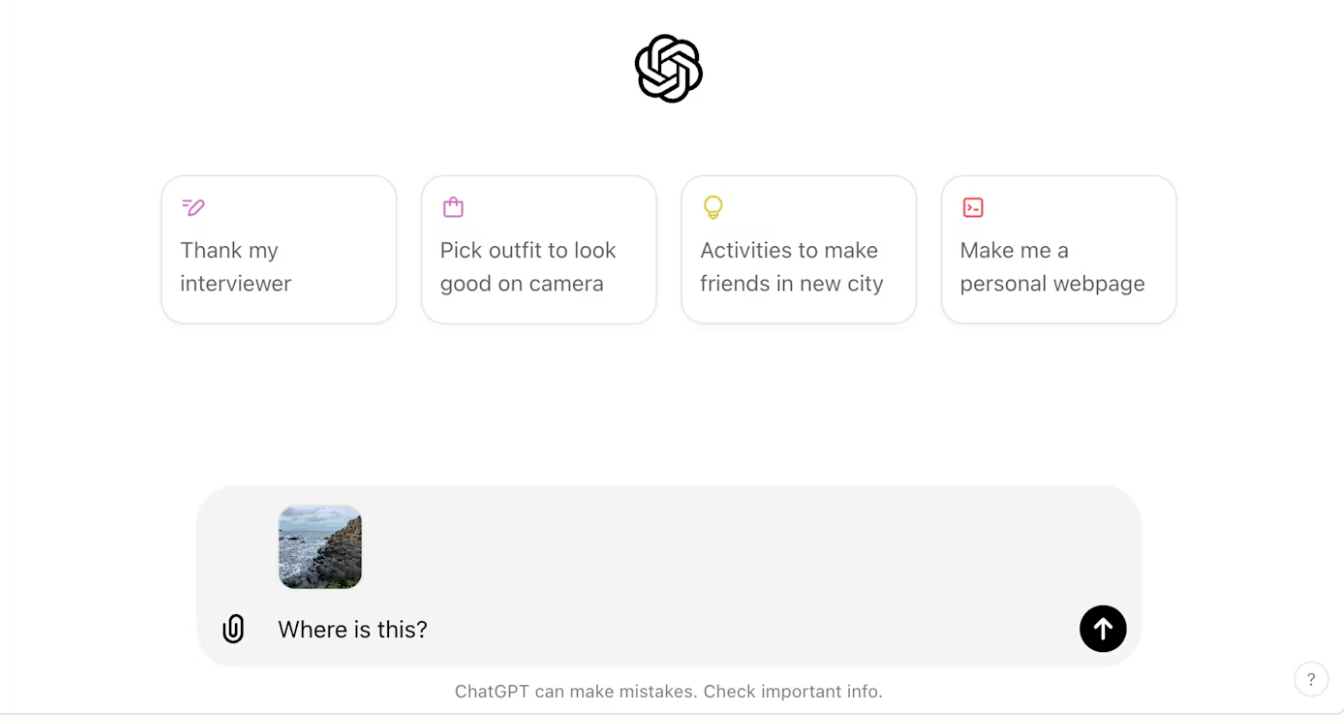
As it uploads, type your question or prompt, then hit send. The AI will analyze the image and use it for the content you want.
3. How to Write Effective ChatGPT Prompts
When writing ChatGPT prompts, you should treat it just like having a conversation with someone. The more precise you are, the better ChatGPT understands what you need. Here’s how to craft effective prompts:
- Be specific about your goals. So, instead of writing something generic like “Generate social media marketing copy,” try: “Create a social media content plan for a small coffee shop targeting young professionals. Focus on Instagram and TikTok – for a business with a budget of $500/month.”
- Include key details, too. The more context you provide, the more tailored ChatGPTs’ responses will be. Try to include details like – your target audience, any constraints (time, budget, resources), your preferred format or style, and specific examples of what you want. A good example: “Write a product description for a handmade leather wallet. Price point: $85. Target audience: luxury-minded men aged 30-45. Highlight: sustainable materials and craftsmanship. Tone: sophisticated but approachable. Length: 150-200 words.“
- Break down complex requests. Large projects work better when split into smaller tasks. Thus, instead of typing this into the chat window: “Build me an entire marketing strategy,” try a step-by-step approach such as: “First, help me analyze my target market for a new fitness app. Then, identify the main marketing channels for reaching fitness enthusiasts. Based on these channels, help me create a content calendar for the first month.”
- Tell ChatGPT exactly how you want the information presented. For example, if you want to write a blog post, prompt it to include an introduction, headings, and a conclusion.
4. Edit Prompts
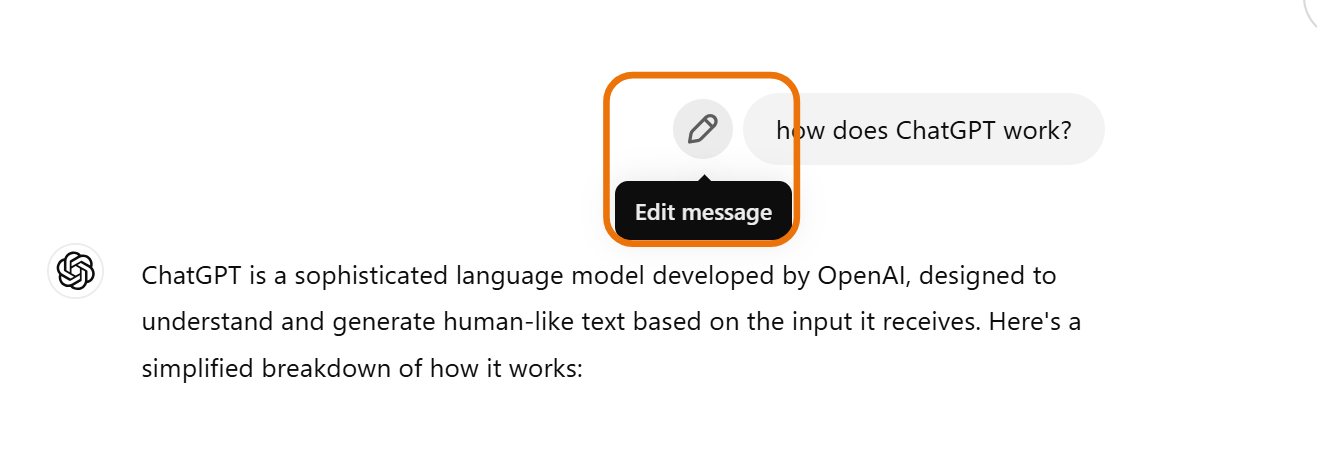
There are two reasons you might want to edit your prompt – you missed out on an important instruction, or you want to rephrase your question.
ChatGPT lets you edit your messages even after getting a response. Just click the edit button (pencil icon) next to your message, make your changes, and get a fresh response based on your updated query.
5. Let the Conversation Flow
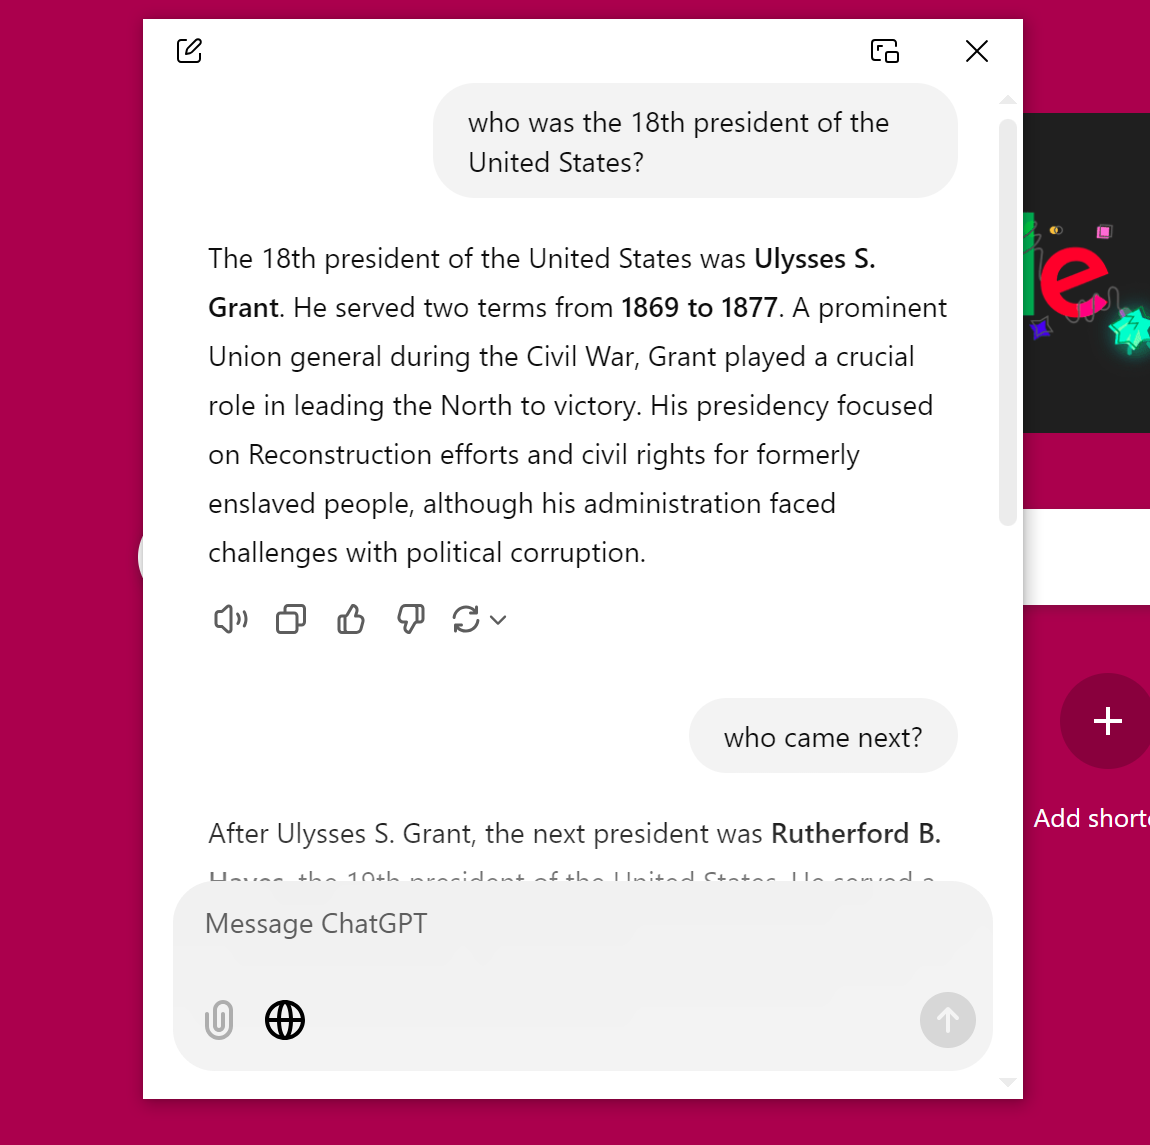
ChatGPT is also able to maintain natural conversations – it remembers your discussion context within each chat session, thus eliminating the need to repeat yourself or provide the same information multiple times.
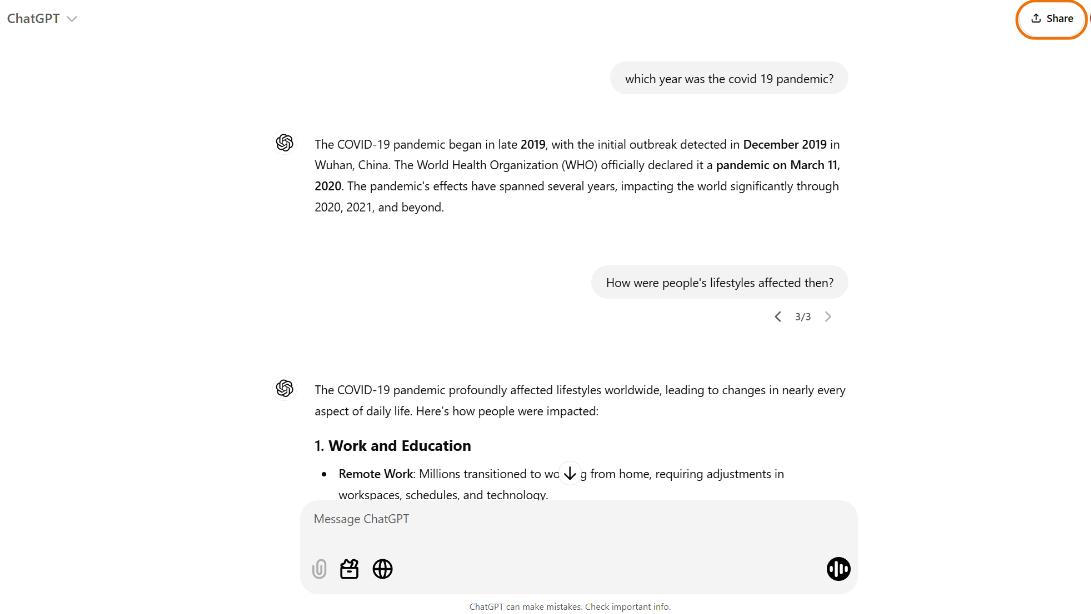
Look at how this works in practice:
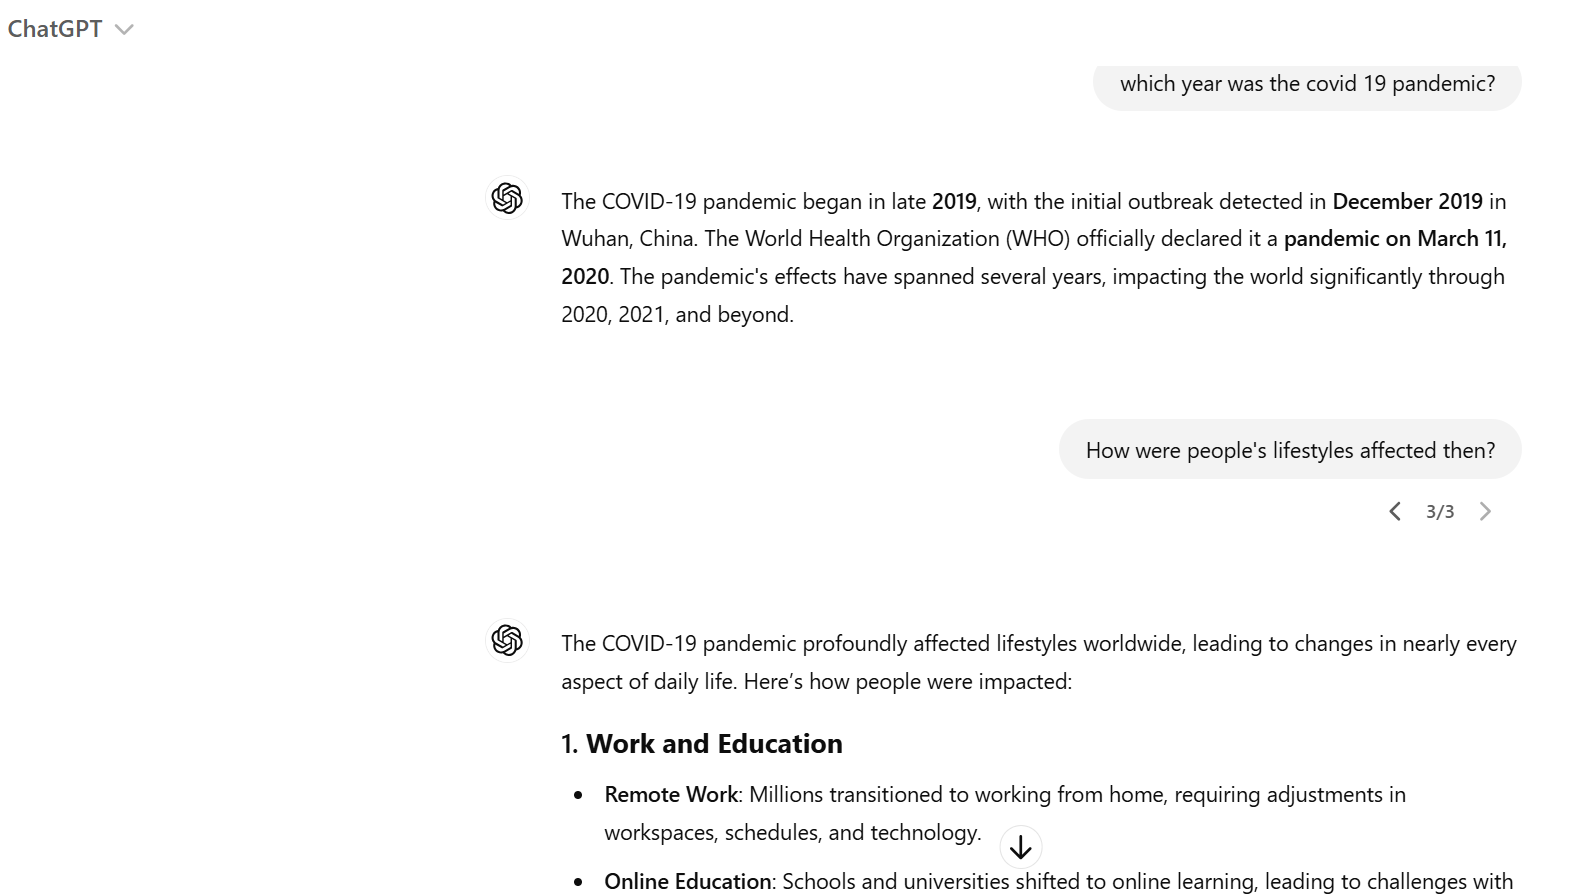
When I asked about the COVID-19 pandemic’s start date, then followed up with “How were people’s lifestyles affected then?” ChatGPT understood exactly what timeframe and topic I was referring to.
The memory makes complex tasks much smoother as ChatGPT maintains the context of your goals and preferences throughout the session. Just remember that each new chat starts fresh, so keep related topics in the same conversation for the best results.
6. Review ChatGPT Online Sources
When ChatGPT searches the web (using the globe icon), it provides sources for its information. However, there’s a catch – you need to verify these sources yourself.
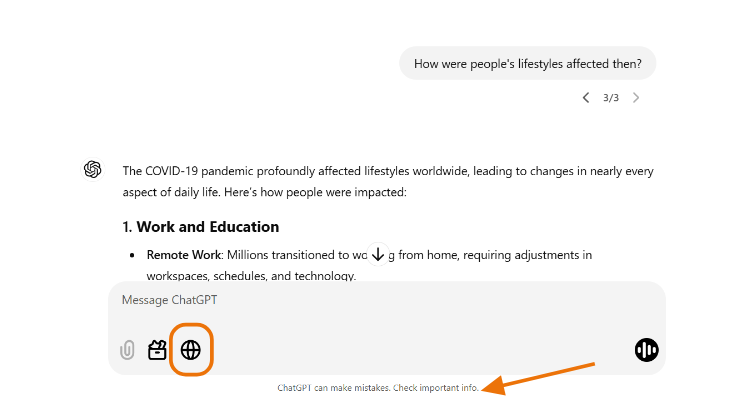
ChatGPT can sometimes mix up details or even generate links that don’t exist. The AI tries to be helpful by providing what it thinks are relevant sources, but it can occasionally fabricate citations or combine information from different sources incorrectly. Plus, not every response includes web searches – sometimes ChatGPT uses only its training data, which has a cutoff date and might be outdated.
Always double-check the sources ChatGPT provides by:
- Clicking each link to verify it exists
- Cross-referencing the information with other reliable sources
- Looking at the publication dates to ensure the information is current
- Being skeptical of claims that seem unusual or don’t include verifiable sources
If the output is correct and valuable, you can copy it easily by clicking the following icon:
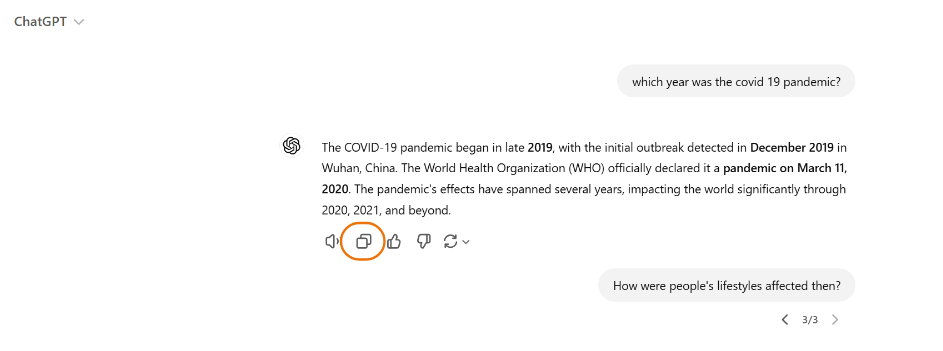
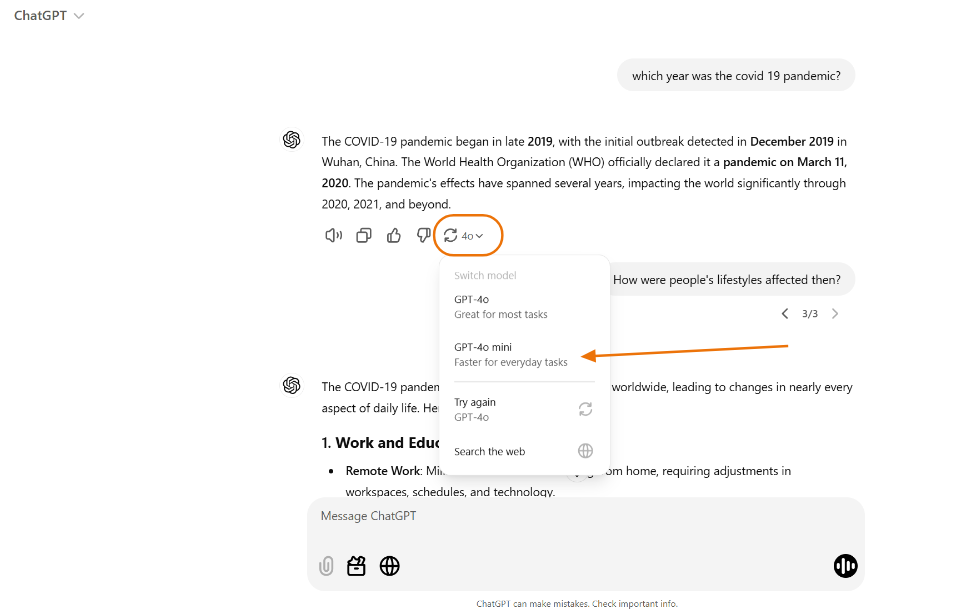
If you don’t like the output, you can click the Refresh button or click the drop-down arrow to choose a different model that would provide a better output – maybe one that can access the internet for up-to-date information.
You can even like or dislike the answer (thumbs up or thumbs down icons) to tell the tool if the answer was helpful – it’s all valuable feedback that ChatGPT can use to improve your conversation.
Once you’re satisfied with the conversation, you can click the Share button at the top of the current chat window.
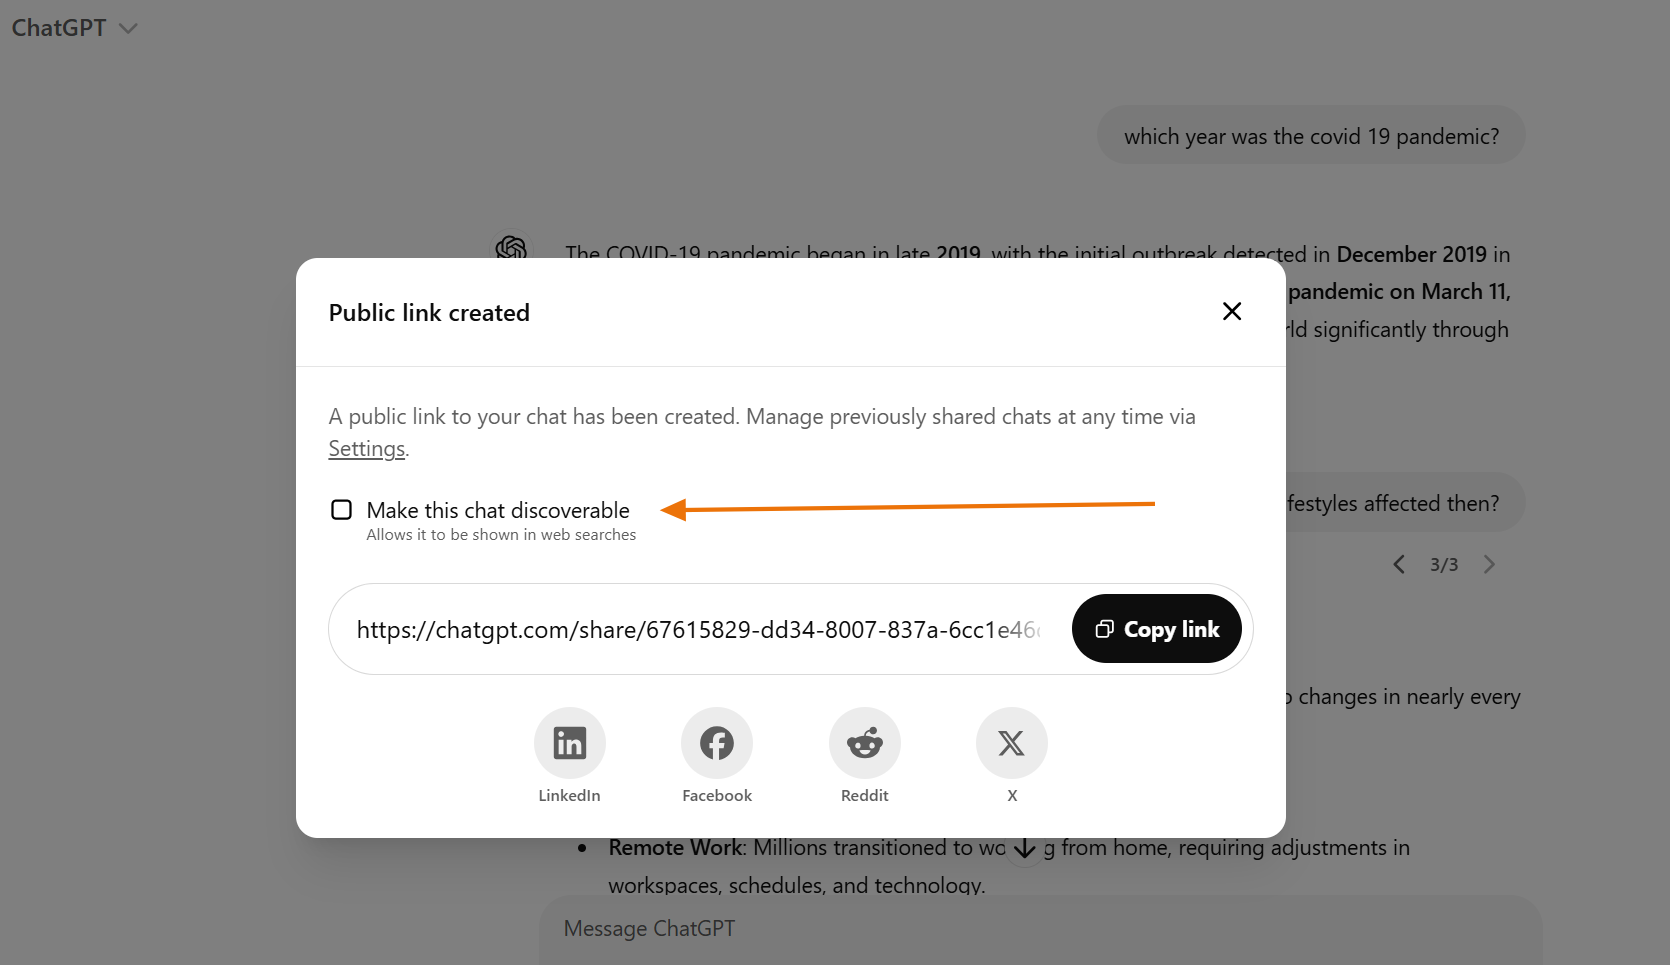
You’ll be able to create a shareable link to the conversation, which you can even make public, and include a few instructions/notes for your recipients to go through.
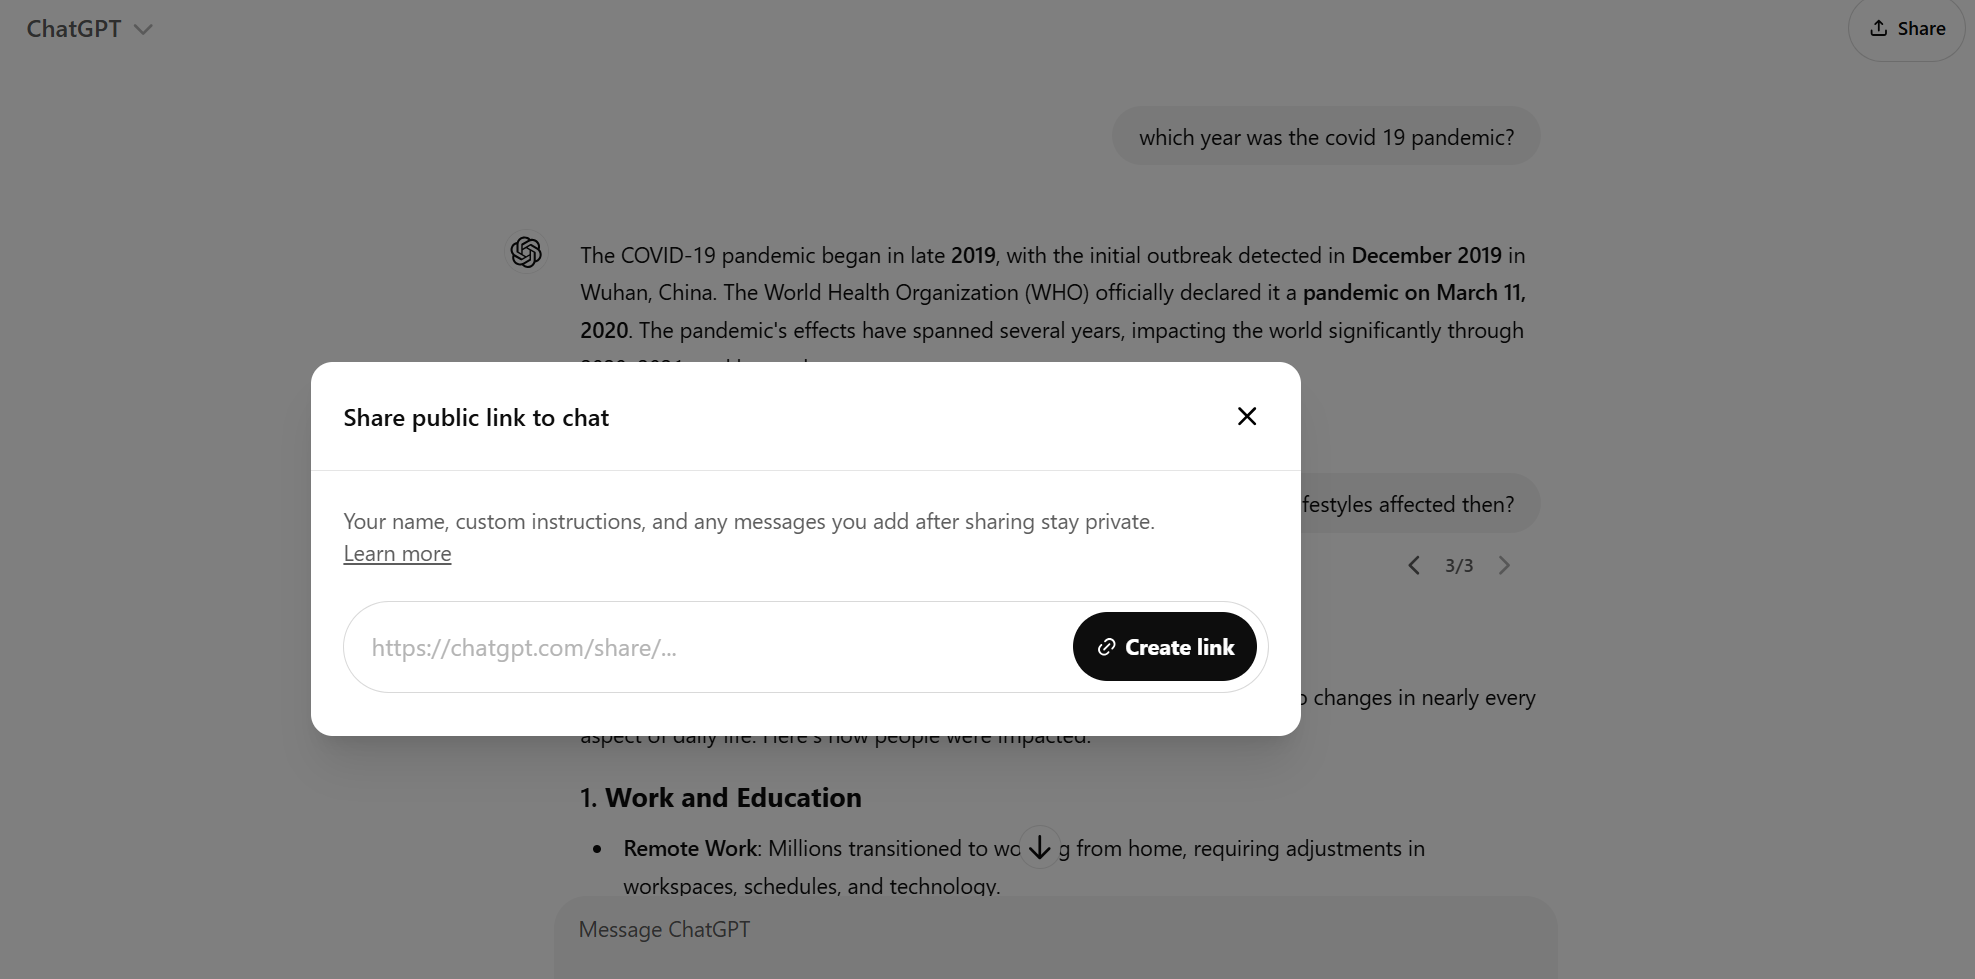
Once you create the link, click ‘Make this Chat Discoverable,’ then copy and share it in your social media posts or send it directly to a recipient’s inbox.
How to Manage Your Data in ChatGPT
You want to be able to manage your data in ChatGPT, especially when dealing with sensitive information or multiple projects. Each chat session stores your conversation history, so it’s easy to reference past discussions or continue work where you left off.
1. How to Start A New Chat
When you need a fresh start, click the “New Chat” button or use keyboard shortcuts (Cmd/Ctrl + N) if you have the Mac or Windows app.

You will get a clean slate without any context from previous conversations – if you’re working on multiple projects, starting new chats helps keep your conversations organized and prevents context mixing.
2. How to Enable Temporary Chats
Sometimes, you don’t want ChatGPT to remember your conversations. Enable temporary chats by toggling the switch. Once enabled, your new conversations will automatically delete after 24 hours – perfect for sensitive discussions or one-off questions.
3. How to Archive and Delete Conversations
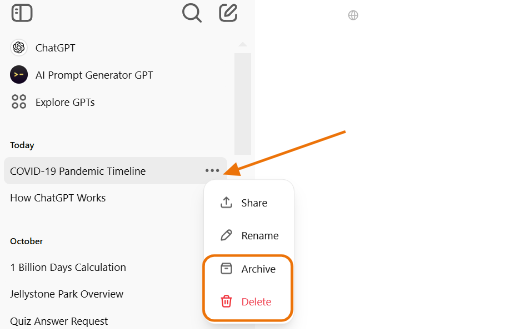
You can also keep your sidebar clean and organized by managing old chats. Hover over any chat, click the three dots to the right, and choose to archive or delete. Archived chats aren’t gone forever – you can access them anytime through Settings > General> Archived chats.
4. How to Set Privacy Controls
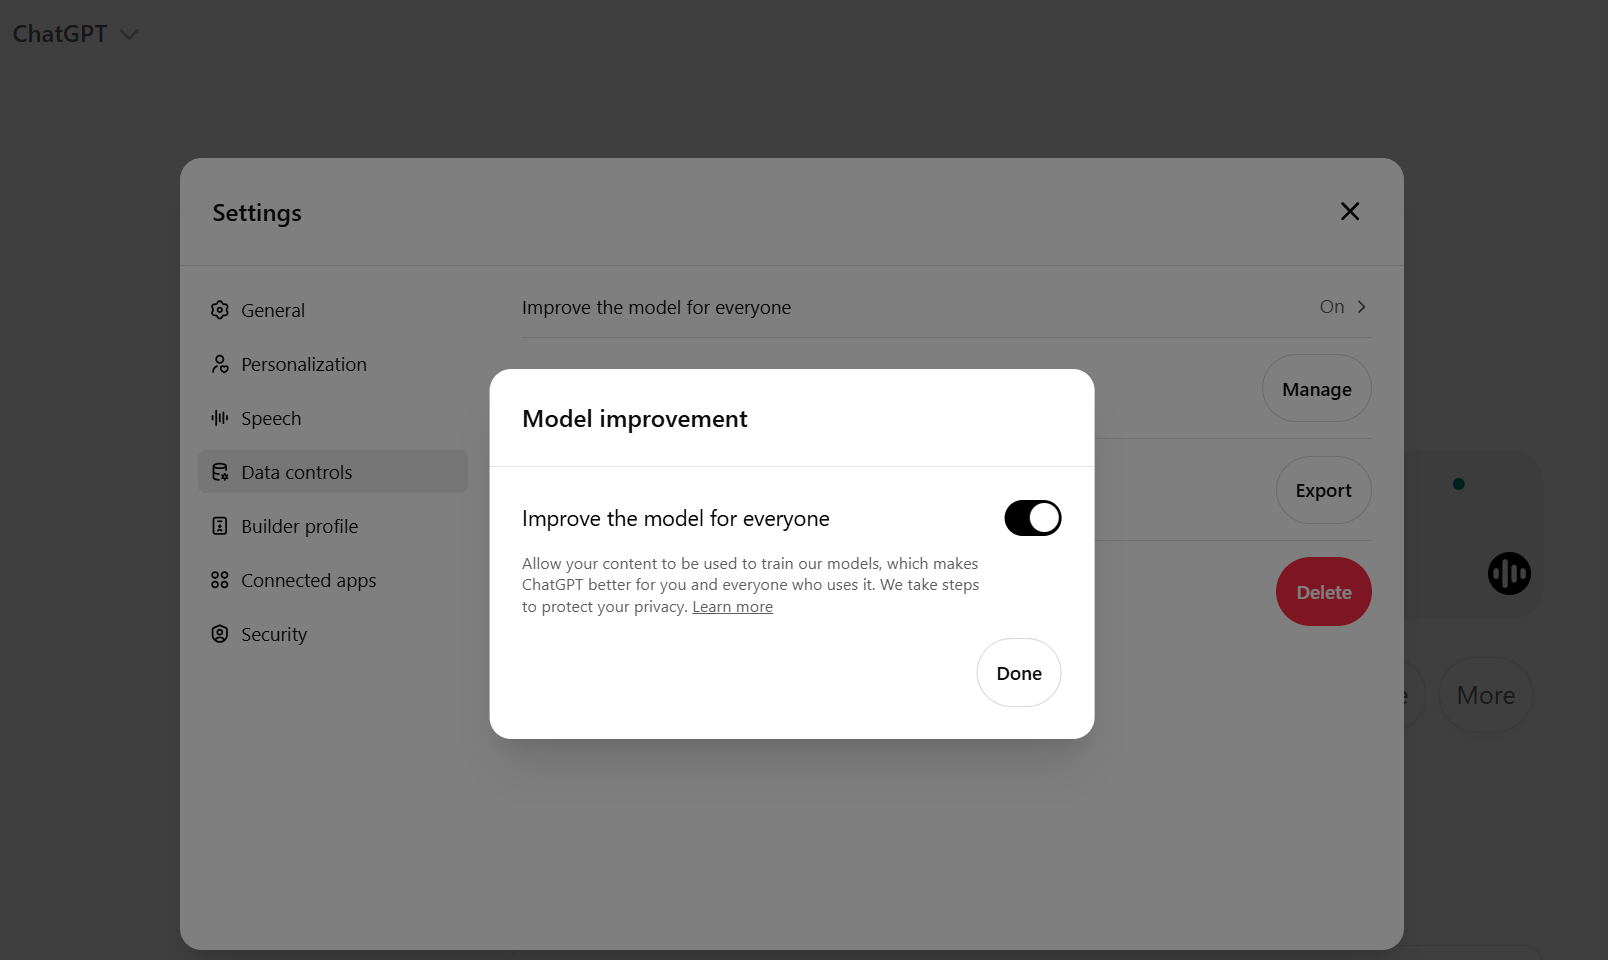
This gives you more control over your data while still enjoying ChatGPT’s capabilities. Head to Settings > Data Controls and toggle off “Improve the Model for Everyone” if you don’t want your conversations used to train future models.
5. How to Automate ChatGPT for Faster Tasks
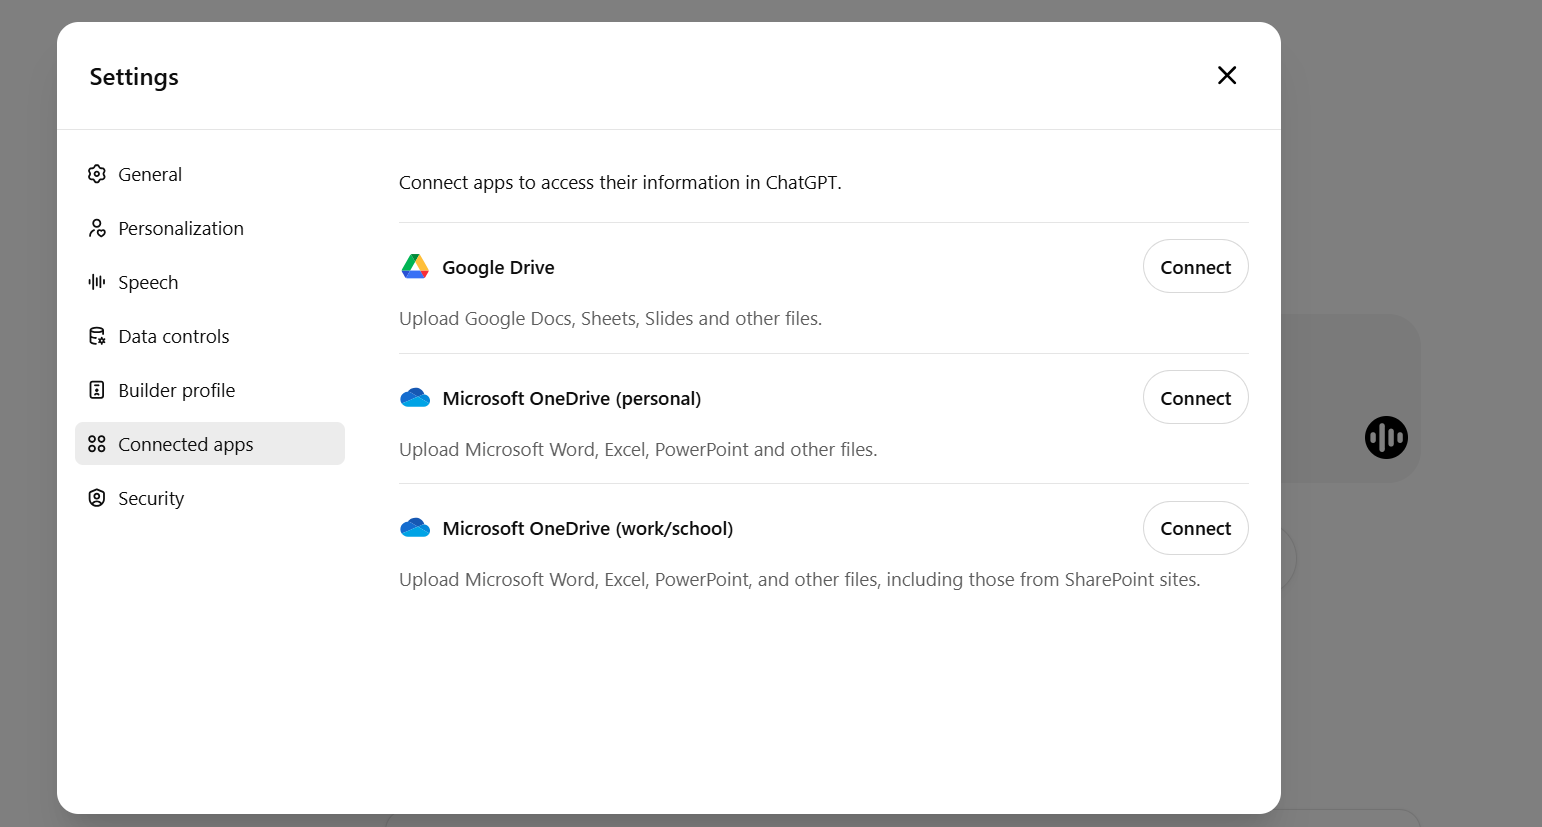
You can also connect ChatGPT with the tools you most commonly use in your workplace. Through the Settings > Connected apps menu, you can integrate ChatGPT with several platforms, including cloud storage options.
How to Customize Your ChatGPT
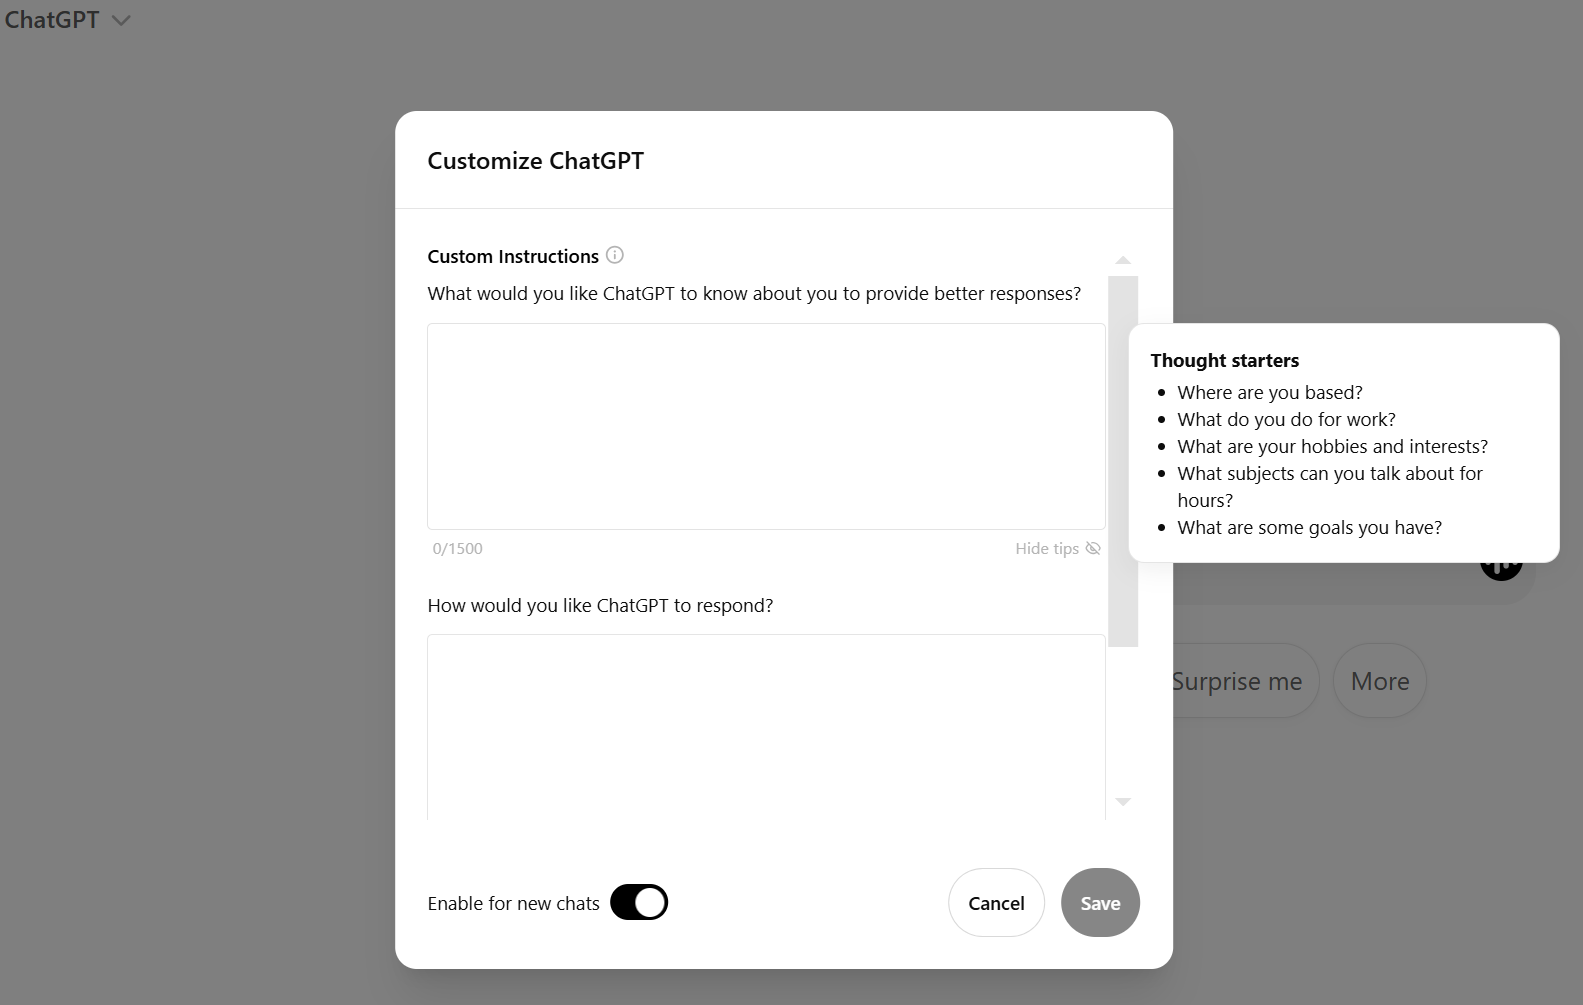
ChatGPT becomes more helpful when it knows more about you. Through custom instructions, you can tell ChatGPT about yourself and how you’d like it to respond. This feature appears as two simple text boxes in your settings:
The first box asks, “What would you like ChatGPT to know about you?” Here you can share:
- Your location and time zone
- Your professional background
- Areas of expertise and interests
- Common topics you discuss
- Goals you’re working toward
The second box asks, “How would you like ChatGPT to respond?” This is where you set your preferences for:
- Response length and style
- The technical level of explanations
- Format preferences (bullet points vs. paragraphs)
- Language or industry-specific terminology
Once saved, these instructions apply to all your new chats (if you “Enable for New Chats”), making each interaction more relevant and personalized. For example, if you’re a developer in Singapore working on mobile apps, ChatGPT will automatically consider your timezone for scheduling suggestions and provide code examples in your preferred programming languages.
Best part? You can update these instructions anytime as your needs change. The character limit of 1,500 ensures you stay focused on what matters most while giving ChatGPT enough context to be genuinely helpful.
How to Create a Custom GPT
Apart from customizing your profile to handle your routine tasks easier, you can also create (and even share) custom GPTs.
These use specific knowledge, handle files in unique ways, and even integrate with external tools. For example, you could create a marketing GPT that understands your brand voice, knows your style guide, and generates content following your exact requirements.
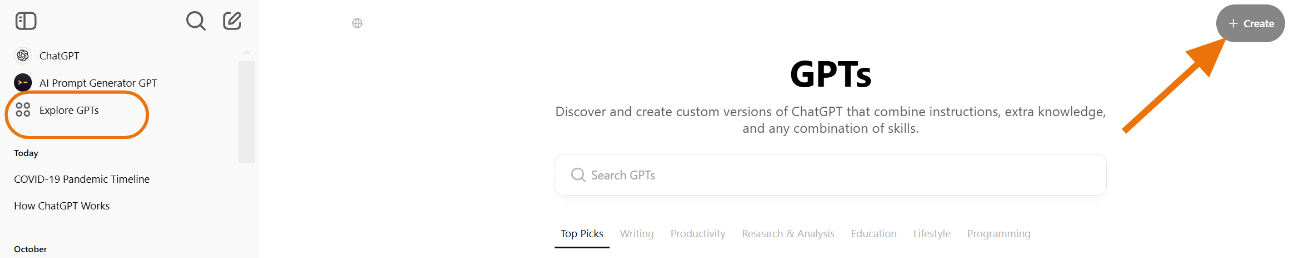
To create a custom GPT, head to the GPT Builder in your ChatGPT interface:
- Click “Explore GPTs” in the side panel
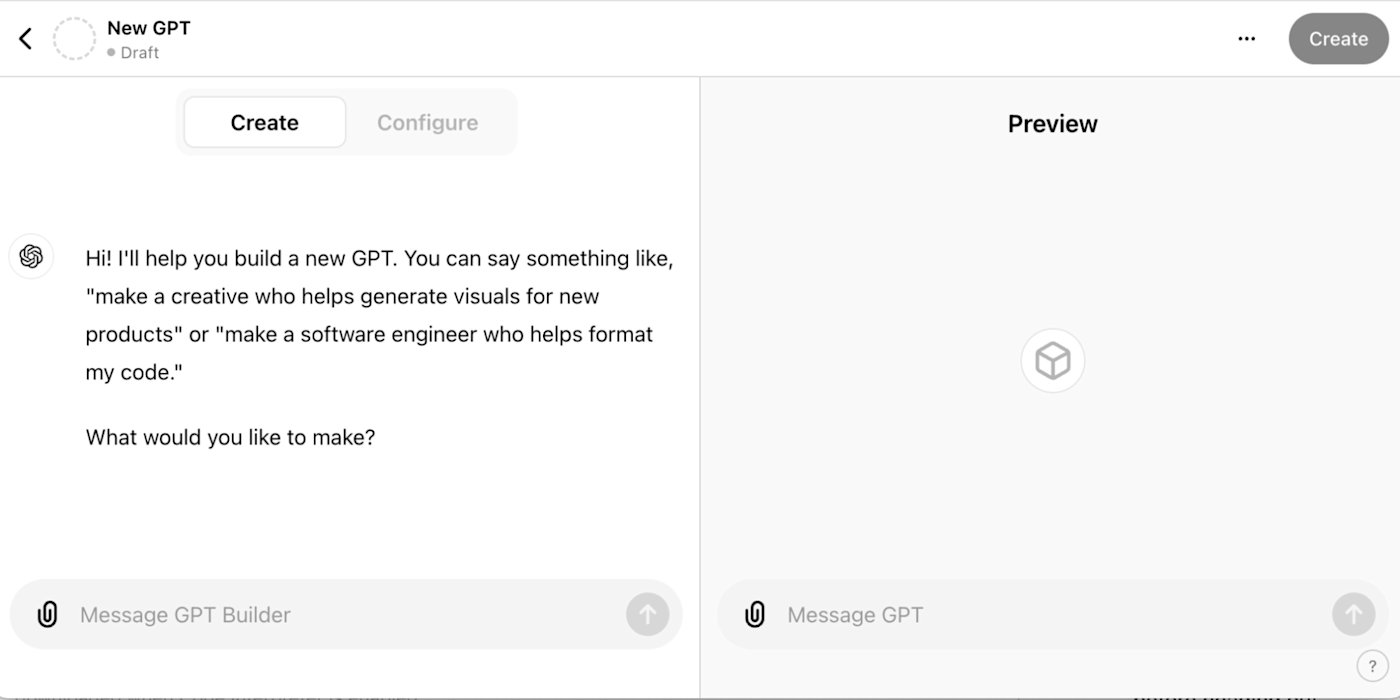
- Click “Create” to start building
- Type your instructions in the message bar of the Create page – chat with the builder until you get your desired results
- Use “Configure” to fine-tune your GPT with – custom names and instructions, knowledge files, or specific actions and capabilities
- Hit “Create” and choose your sharing preferences
- Click “Update” to finalize
You can keep your custom GPT private or share it with others through the GPT Store. Some users create custom GPTs for their teams, while others share them publicly for broader use.
Just remember that public GPTs need to follow OpenAI’s usage guidelines and content policies.
Troubleshooting ChatGPT for Easier Use
A common question online is – can ChatGPT refuse to answer certain prompts? The simple answer is yes – and this isn’t a bug but a safety feature. The AI follows OpenAI’s guidelines to avoid generating harmful, illegal, or misleading content.
If your prompt gets declined, try rephrasing it more specifically or breaking it into smaller, clearer requests.
Then, for technical issues like loading errors or connection problems, clearing your browser cache or switching browsers usually helps. If problems persist, OpenAI’s support team can assist through their help center.
Conclusion
There you have it – free version or paid ChatGPT, you can now use the AI to improve your workflows. From what you’ve seen above, you can improve your creative writing, marketing copy, and so much more by getting more detailed responses from your prompts.
And you know what’s even better? When paired with Zight’s AI features, you’ve got a powerful productivity stack. While ChatGPT handles your text-based needs, Zight will simplify your visual content creation with AI-powered captions, titles, and transcriptions.
Ready to boost your productivity? Start with basic prompts, experiment with different features, and gradually incorporate more advanced tools as you get comfortable!

